Custom Detection Types
The Custom Detection Types feature gives you greater control over the types of sensitive data that Compliance for Confluence will look for across your Confluence site. It enables you to create your own detection types using regular expressions, allowing for the precise identification of patterns within the Confluence instance.
To get started with the Custom Detection Types feature, please follow the user guide below:
Access Custom Detection Types
To create a new detection type, start by clicking the Apps menu at the top of Confluence.

Quickly access Compliance from the Apps menu
Then navigate to Compliance, click Settings in the left-hand navigation menu, and go to Detection Types.
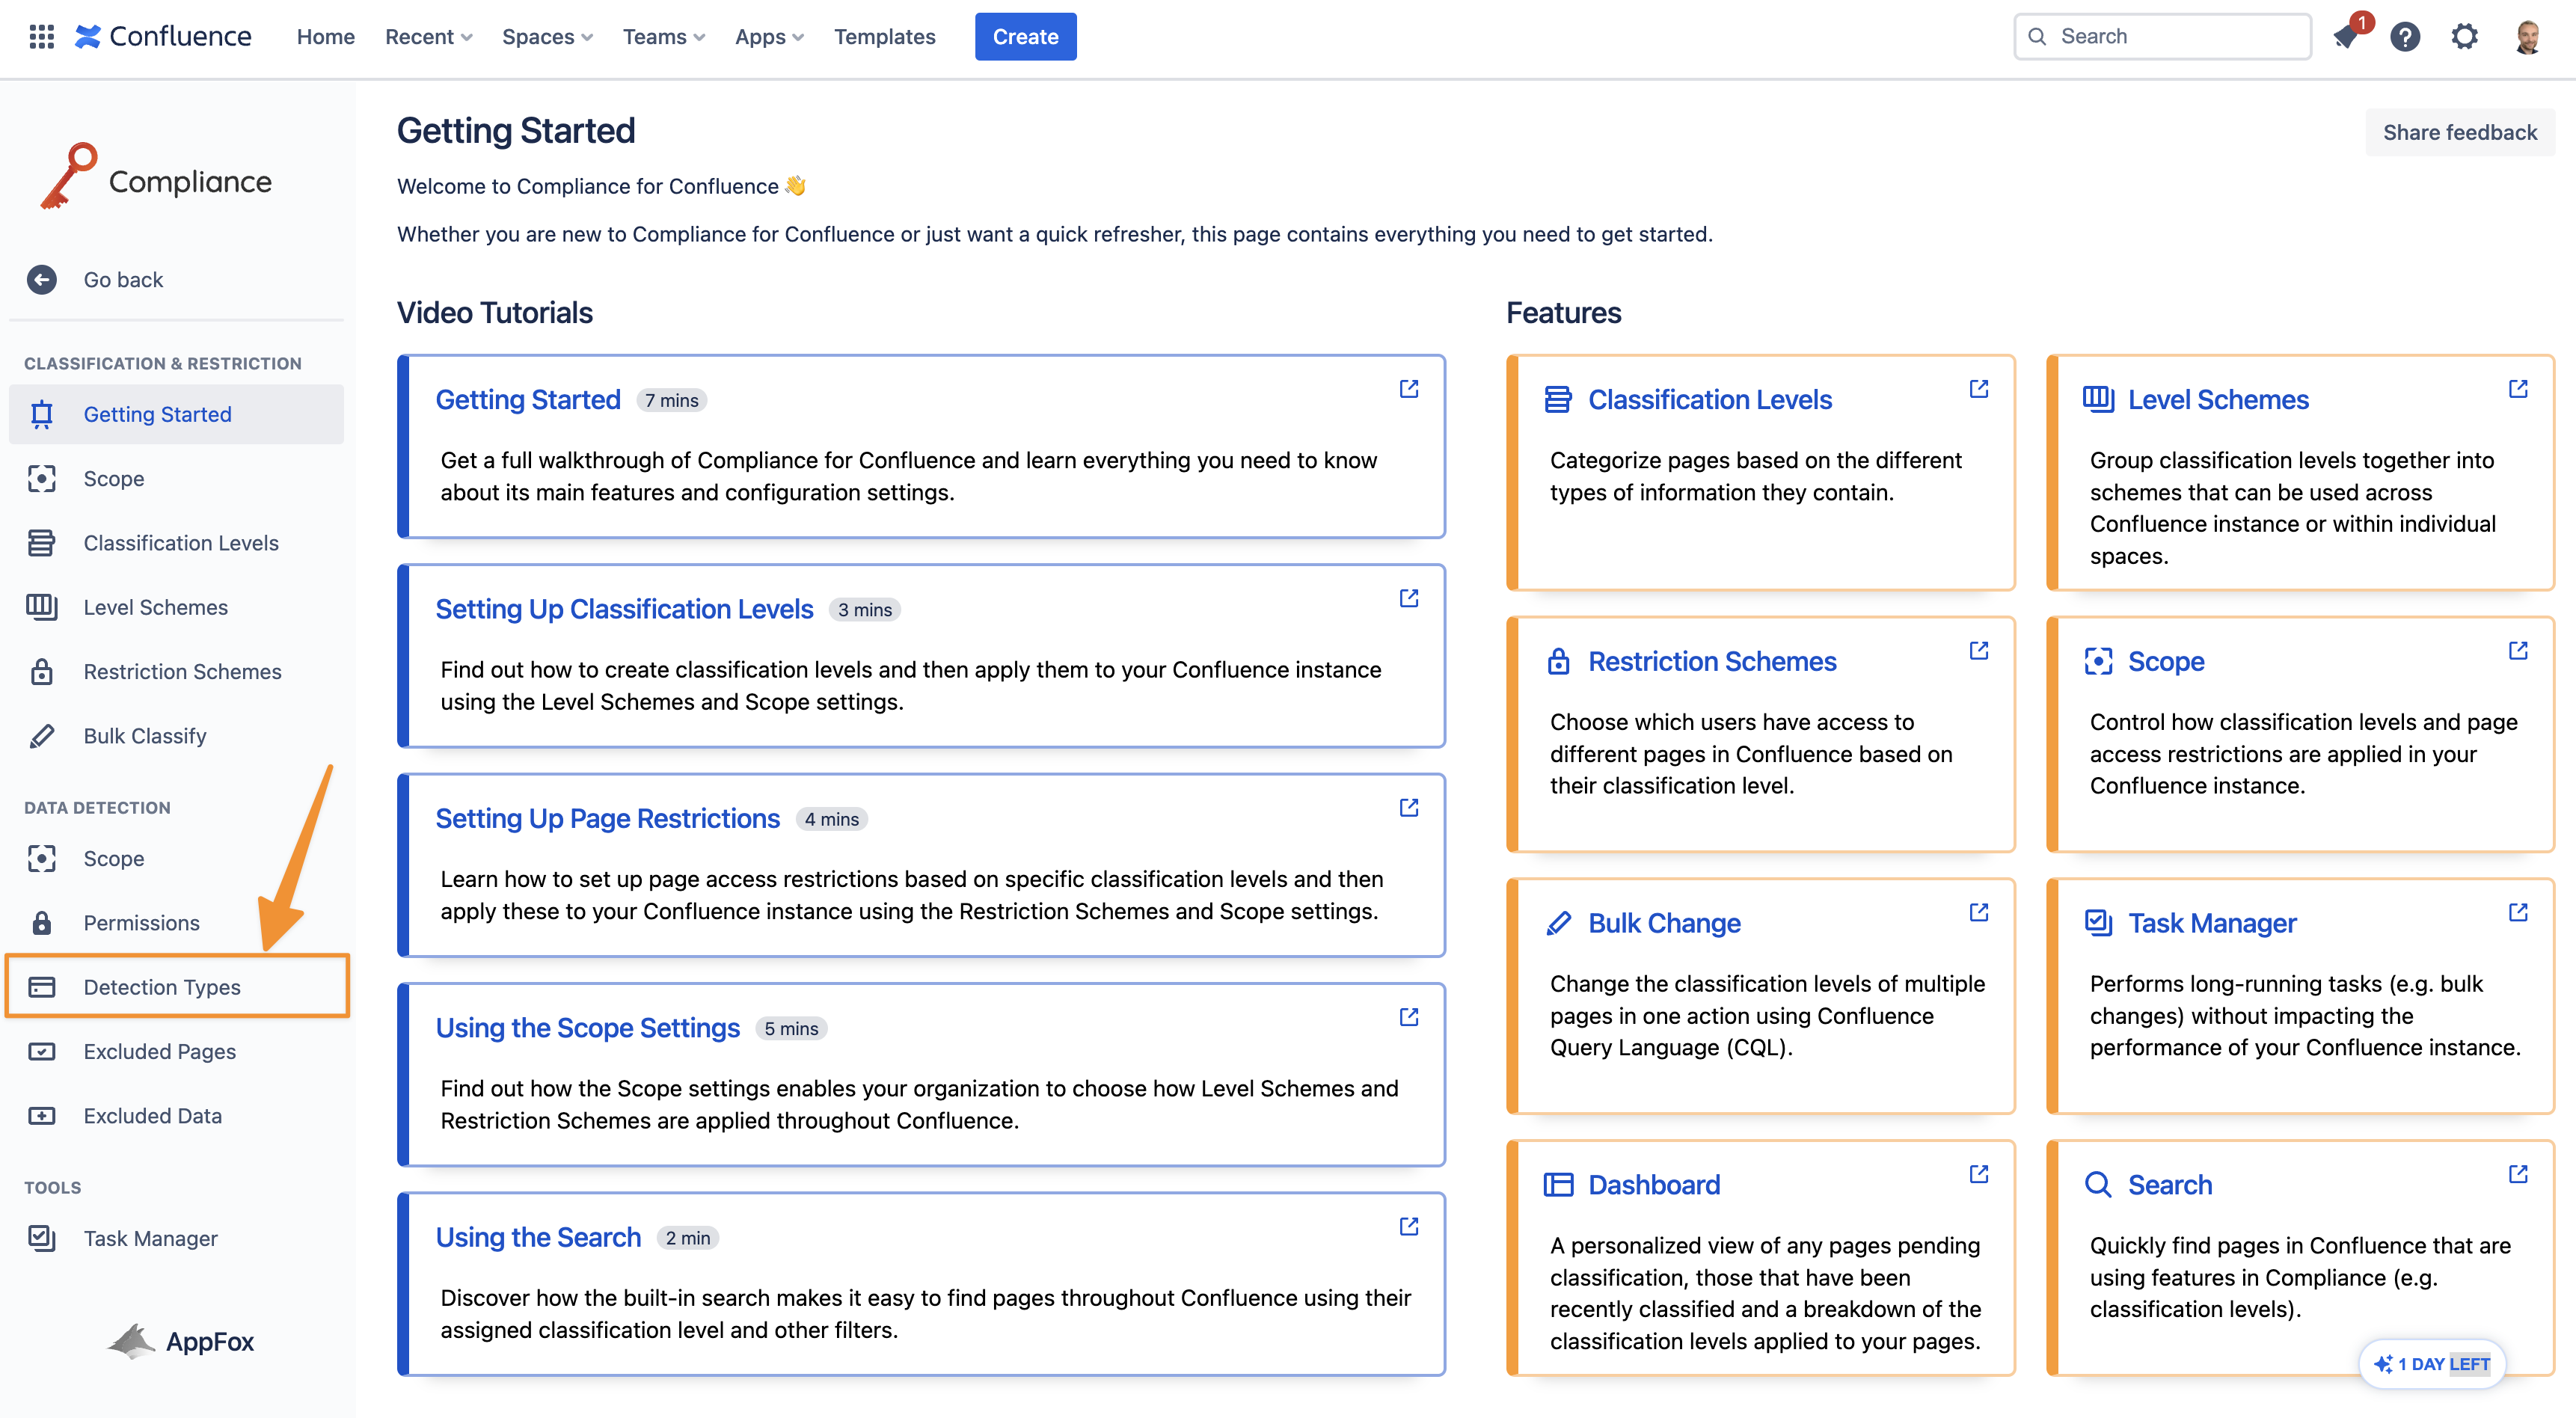
Access Detection Types within the Compliance settings
Create Custom Detection Types
On the Detection Types page, click Create to open the window to create a new detection type.

Start the custom detection type creation process
You will then see the Creation window appear, as shown below.
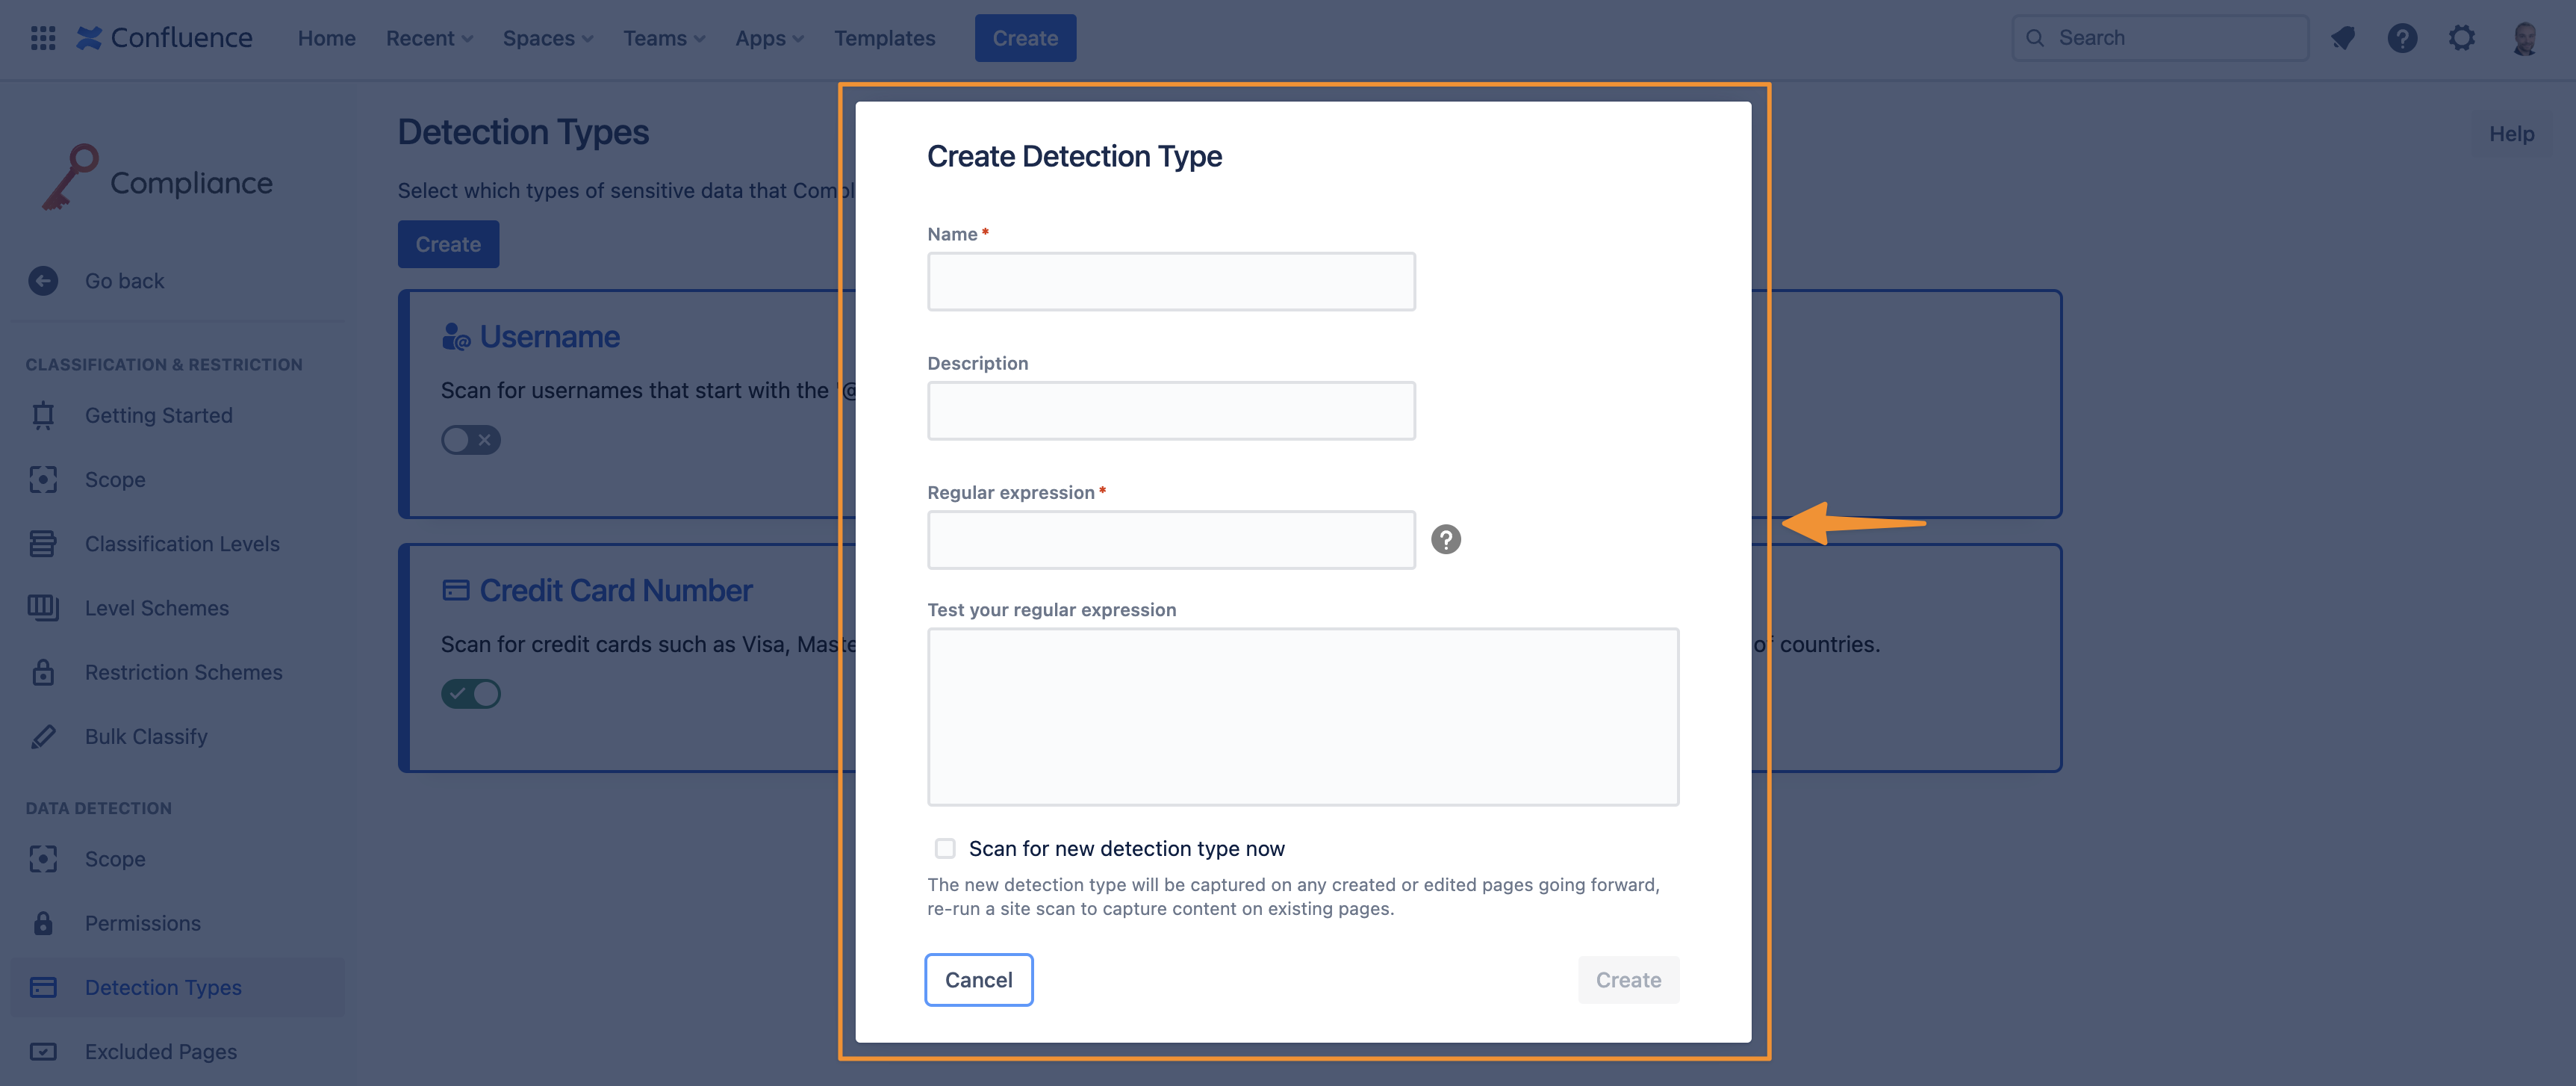
Configure your custom detection type
Provide a name and description (optional) for the detection type.
Now it’s time to create your regular expression.
Create your regular expression
When creating your regular expression in Compliance for Confluence, you have two options:
Write your own regular expressions from scratch
Use one of our ready-made regular expressions
Keep reading to find out more about both of these options.
(1) Write your own regular expressions from scratch
If you are comfortable with regular expressions, you can get started immediately writing your own.
Please check out this guide by Coderpad for more information about regular expressions and how to use them.
(2) Use ready-made regular expressions
We have provided a number of ready-made regular expressions for you to use, including:
Postcodes (UK) e.g. AA1A 1AA -
\b[A-Z]{1,2}[0-9R][0-9A-Z]? [0-9][ABD-HJLNP-UW-Z]{2}\bZIP Codes (US) e.g. 10000 -
\b\d{5}(-\d{4})?\bSocial Security Number (US) e.g.123-45-6789 -
\b\d{3}-\d{2}-\d{4}\bNational Insurance Number (UK) e.g. AA 12 34 56 A -
\b[A-CEGHJ-PR-TW-Za-ceghj-pr-tw-z][A-CEGHJ-NPR-TW-Za-ceghj-npr-tw-z]\s?\d{2}\s?\d{2}\s?\d{2}\s?[A-DFM]{1}\bDates (mm/dd/yyyy or dd/mm/yyyy format) -
(0[1-9]|1[0-2])/(0[1-9]|[12][0-9]|3[01])/\d{4}URLs (http and https) -
\bhttps?://\S+\bHashtags -
#\w+IPv4 addresses -
\b\d{1,3}\.\d{1,3}\.\d{1,3}\.\d{1,3}\b
IPv6 addresses -
\b([\d\w]{4}|0)(\:([\d\w]{4}|0)){7}\bPassport (UK) -
\b\d{9}\bSSN (US) -
\b[\d]{3} [\d]{2} [\d]{4}|([\d] ?){3}[\—\-] ?([\d] ?){2}[\—\-] ?([\d] ?){4}\bSSL Certificate -
-----BEGIN CERTIFICATE-----(?:.|\n)+?\s-----END CERTIFICATE-----AWS secret key -
((secret[-]?access[-]?key)|(SECRET[-]?ACCESS[-]?KEY|(private[-_]?key))|([Ss]ecretAccessKey)).{0,20}[^a-zA-Z0-9+/][a-zA-Z0-9+/]{40}\b
To use these, copy and paste the code snippet into the Regular expression field in the Compliance app.
Testing your regular expressions
Before you create the Custom Detection Type, its important you test the regular expression to ensure it works as expected.
Use the Test your regular expression field to validate whether the regular expression works. Start by inputting the text you would expect your regular expression to match, and any matches will be highlighted in green.
The test area is only used to test the regular expression you have created and nothing entered in this field will be saved.
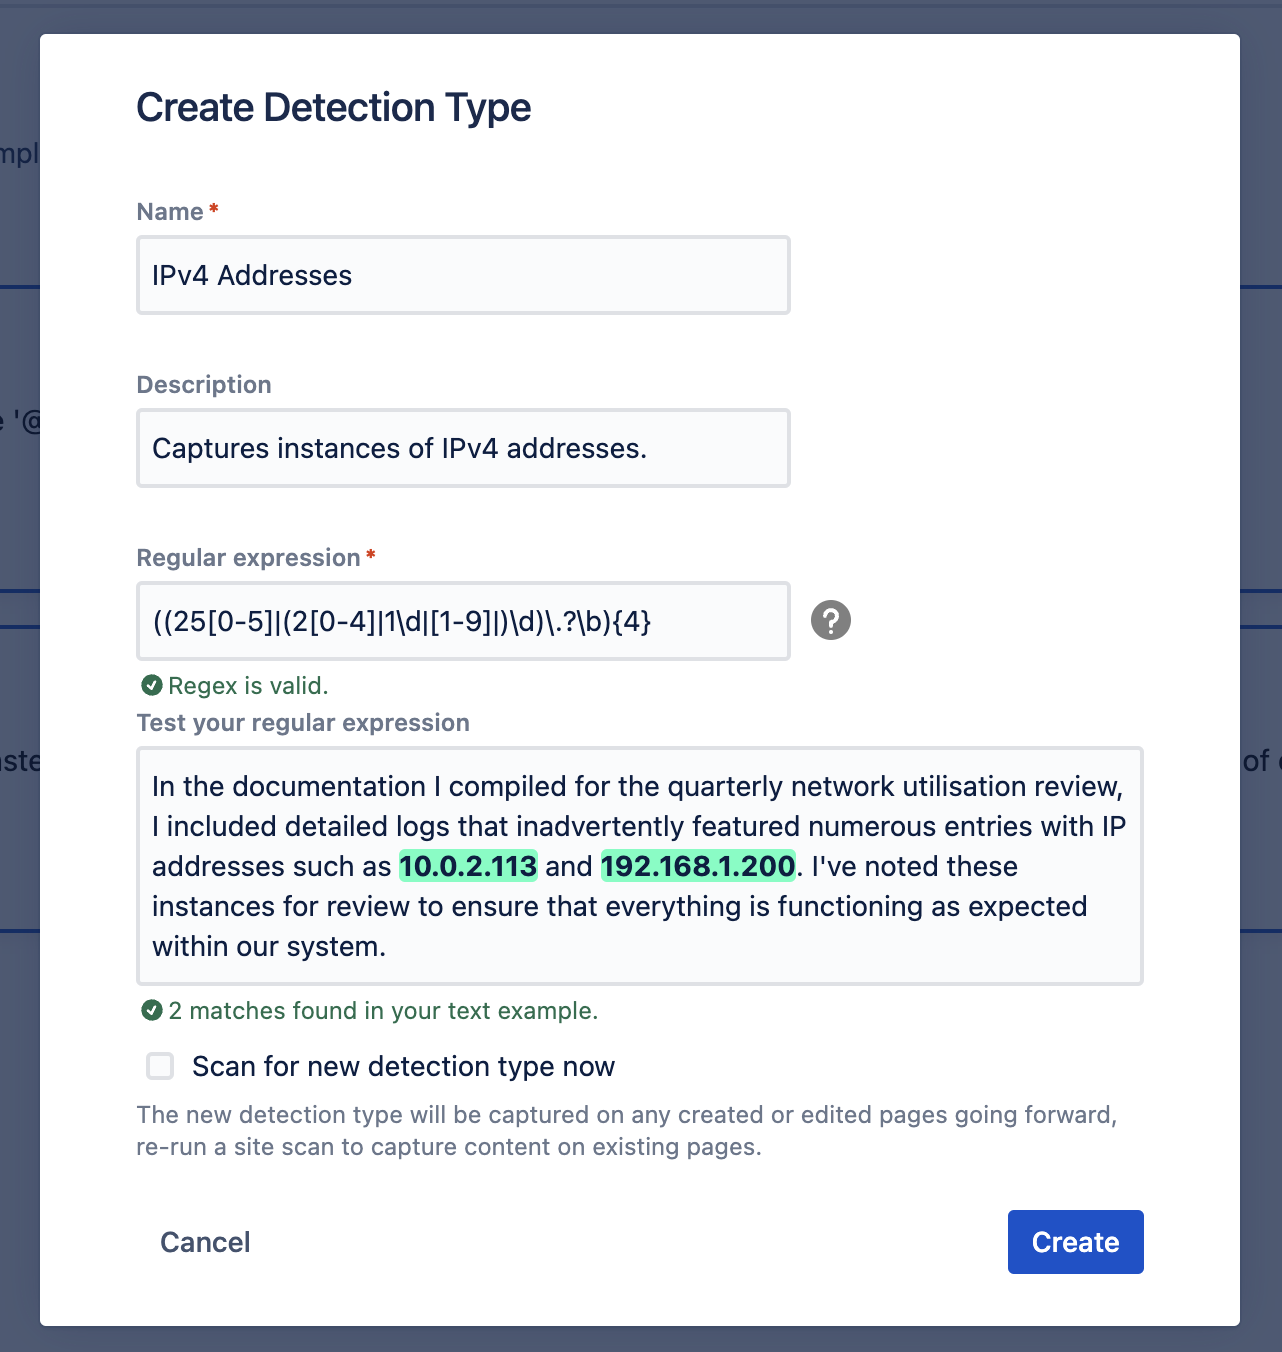
An example IP address detection type
Best Practices: Using Regular Expression for Pattern Detection
These are some best practices when using regular expressions to find specific patterns in Compliance:
Be specific: Craft your regular expressions to be as specific as possible to match only the data you are interested in. Avoid overly broad expressions that might capture unintended content.
Test thoroughly: This helps ensure it accurately identifies the desired patterns.
Consider case sensitivity: Be mindful of whether your regular expression should be case-sensitive or case-insensitive.
Escaping special characters: When your regular expression includes special characters like ., *, +, ?, |, (, or ), make sure to escape them with a backslash
\to match them literally.
Run a Custom Data Detection
If you have already enabled sensitive data detection, you will find a "Scan for new detection type now" checkbox. By selecting this checkbox, a detection scan for the newly created detection type will commence immediately after its creation.
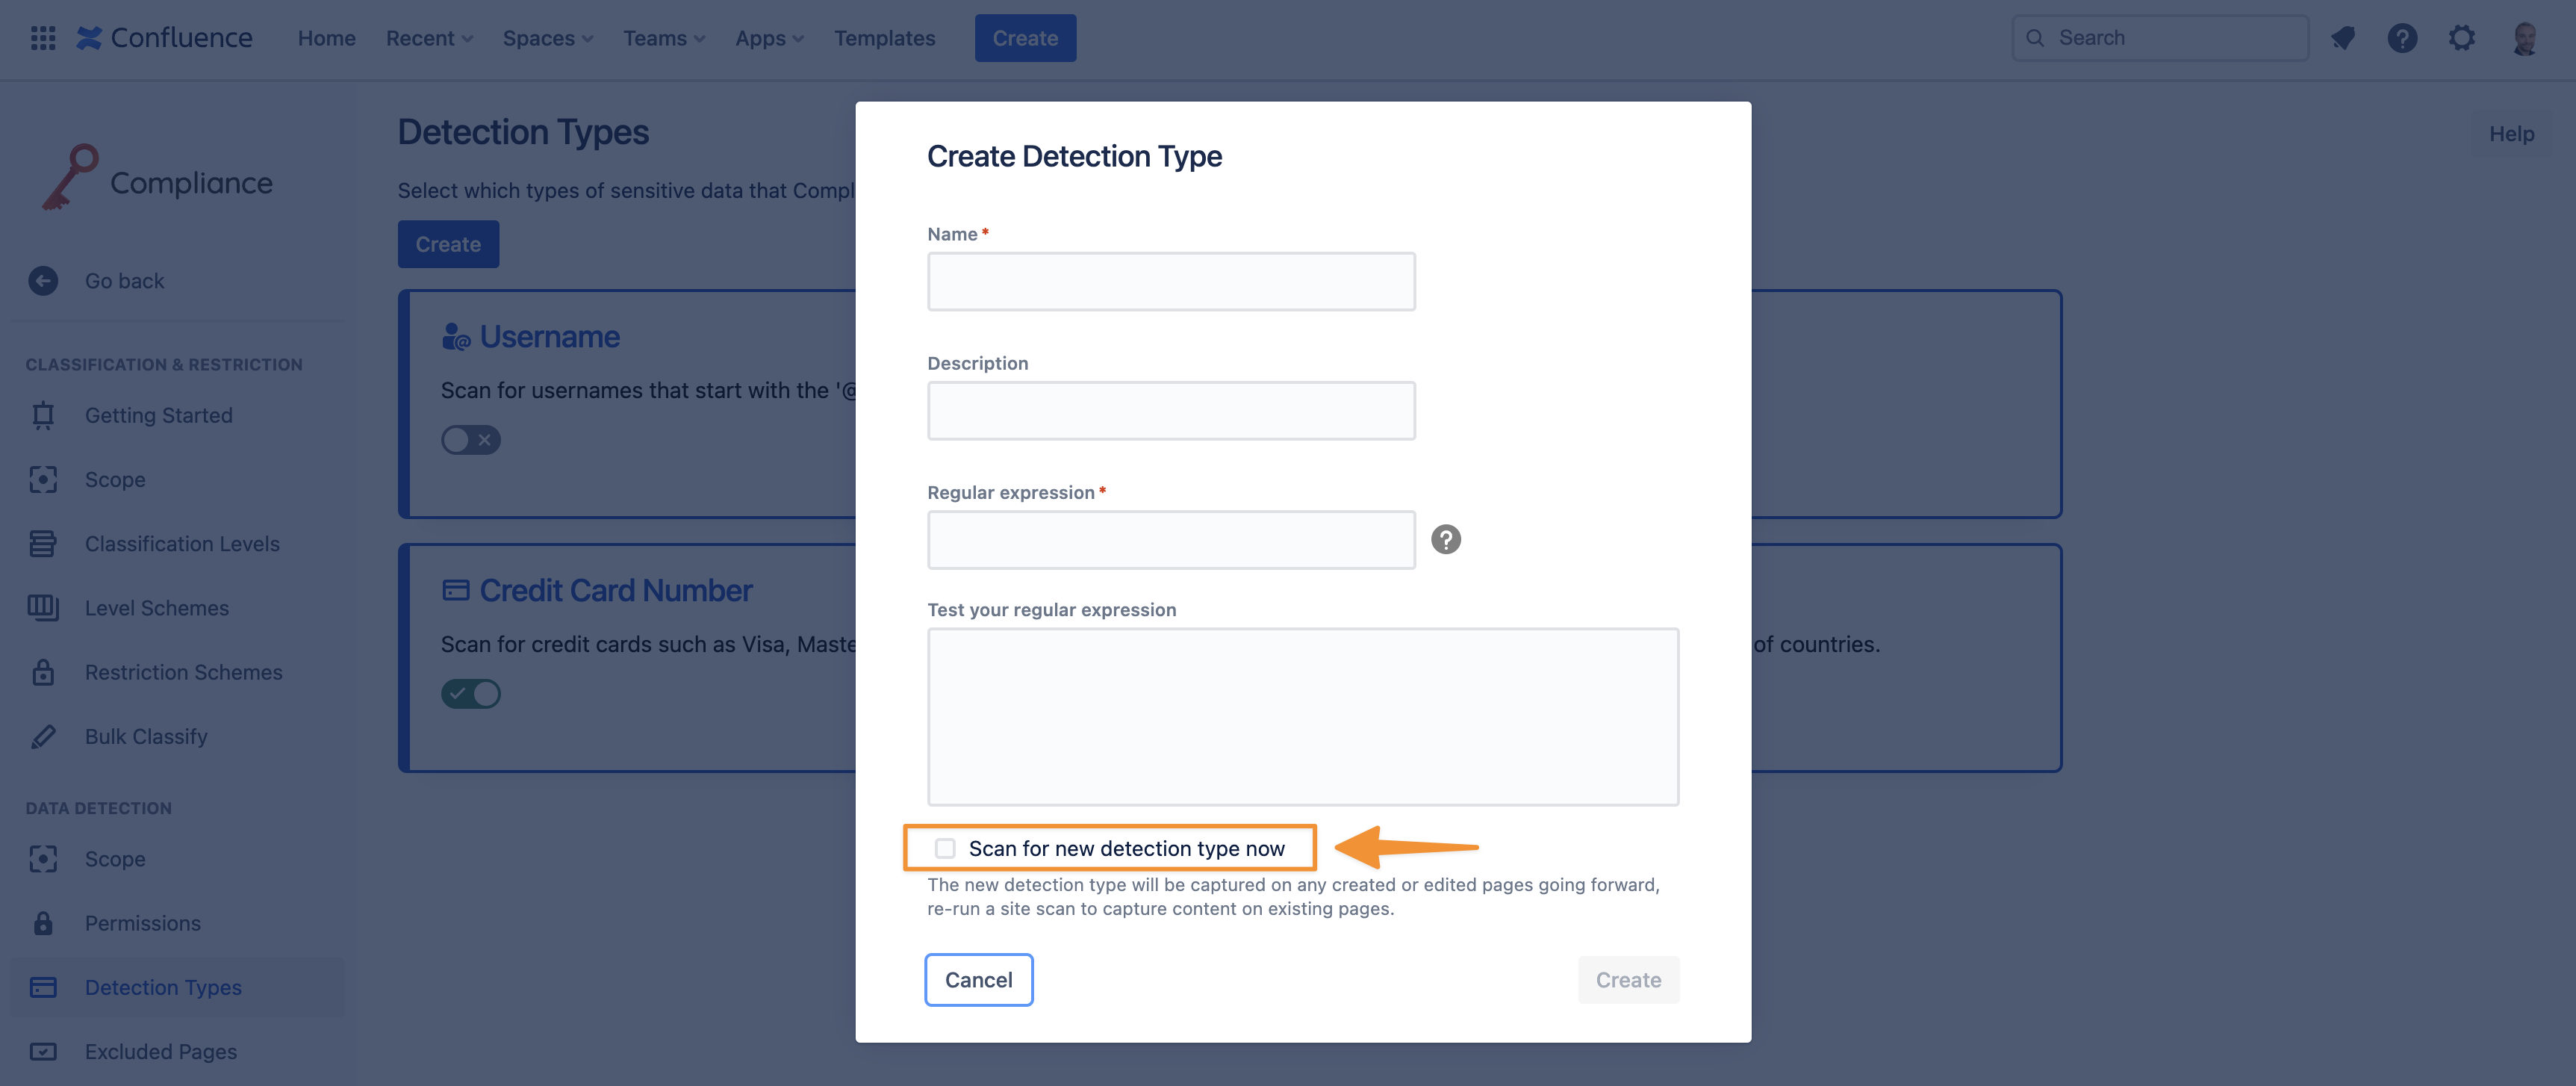
Select the “Scan for new detection type now” option
Once you have reviewed and are satisfied with the details you've entered, simply click Create to add the new detection type. If, for any reason, you wish to abandon the process, you can click Cancel to close the window.
If you create a new detection type while sensitive data detection is disabled, the "Scan for new detection type now" checkbox will not be visible. You can instead enable sensitive data detection at a later time to scan for any added custom detection types.
Modify a Custom Detection Type
To change a custom detection type, first navigate to the Detection Types page. Locate the detection type you want to modify and access its options via the ... menu and click Modify.
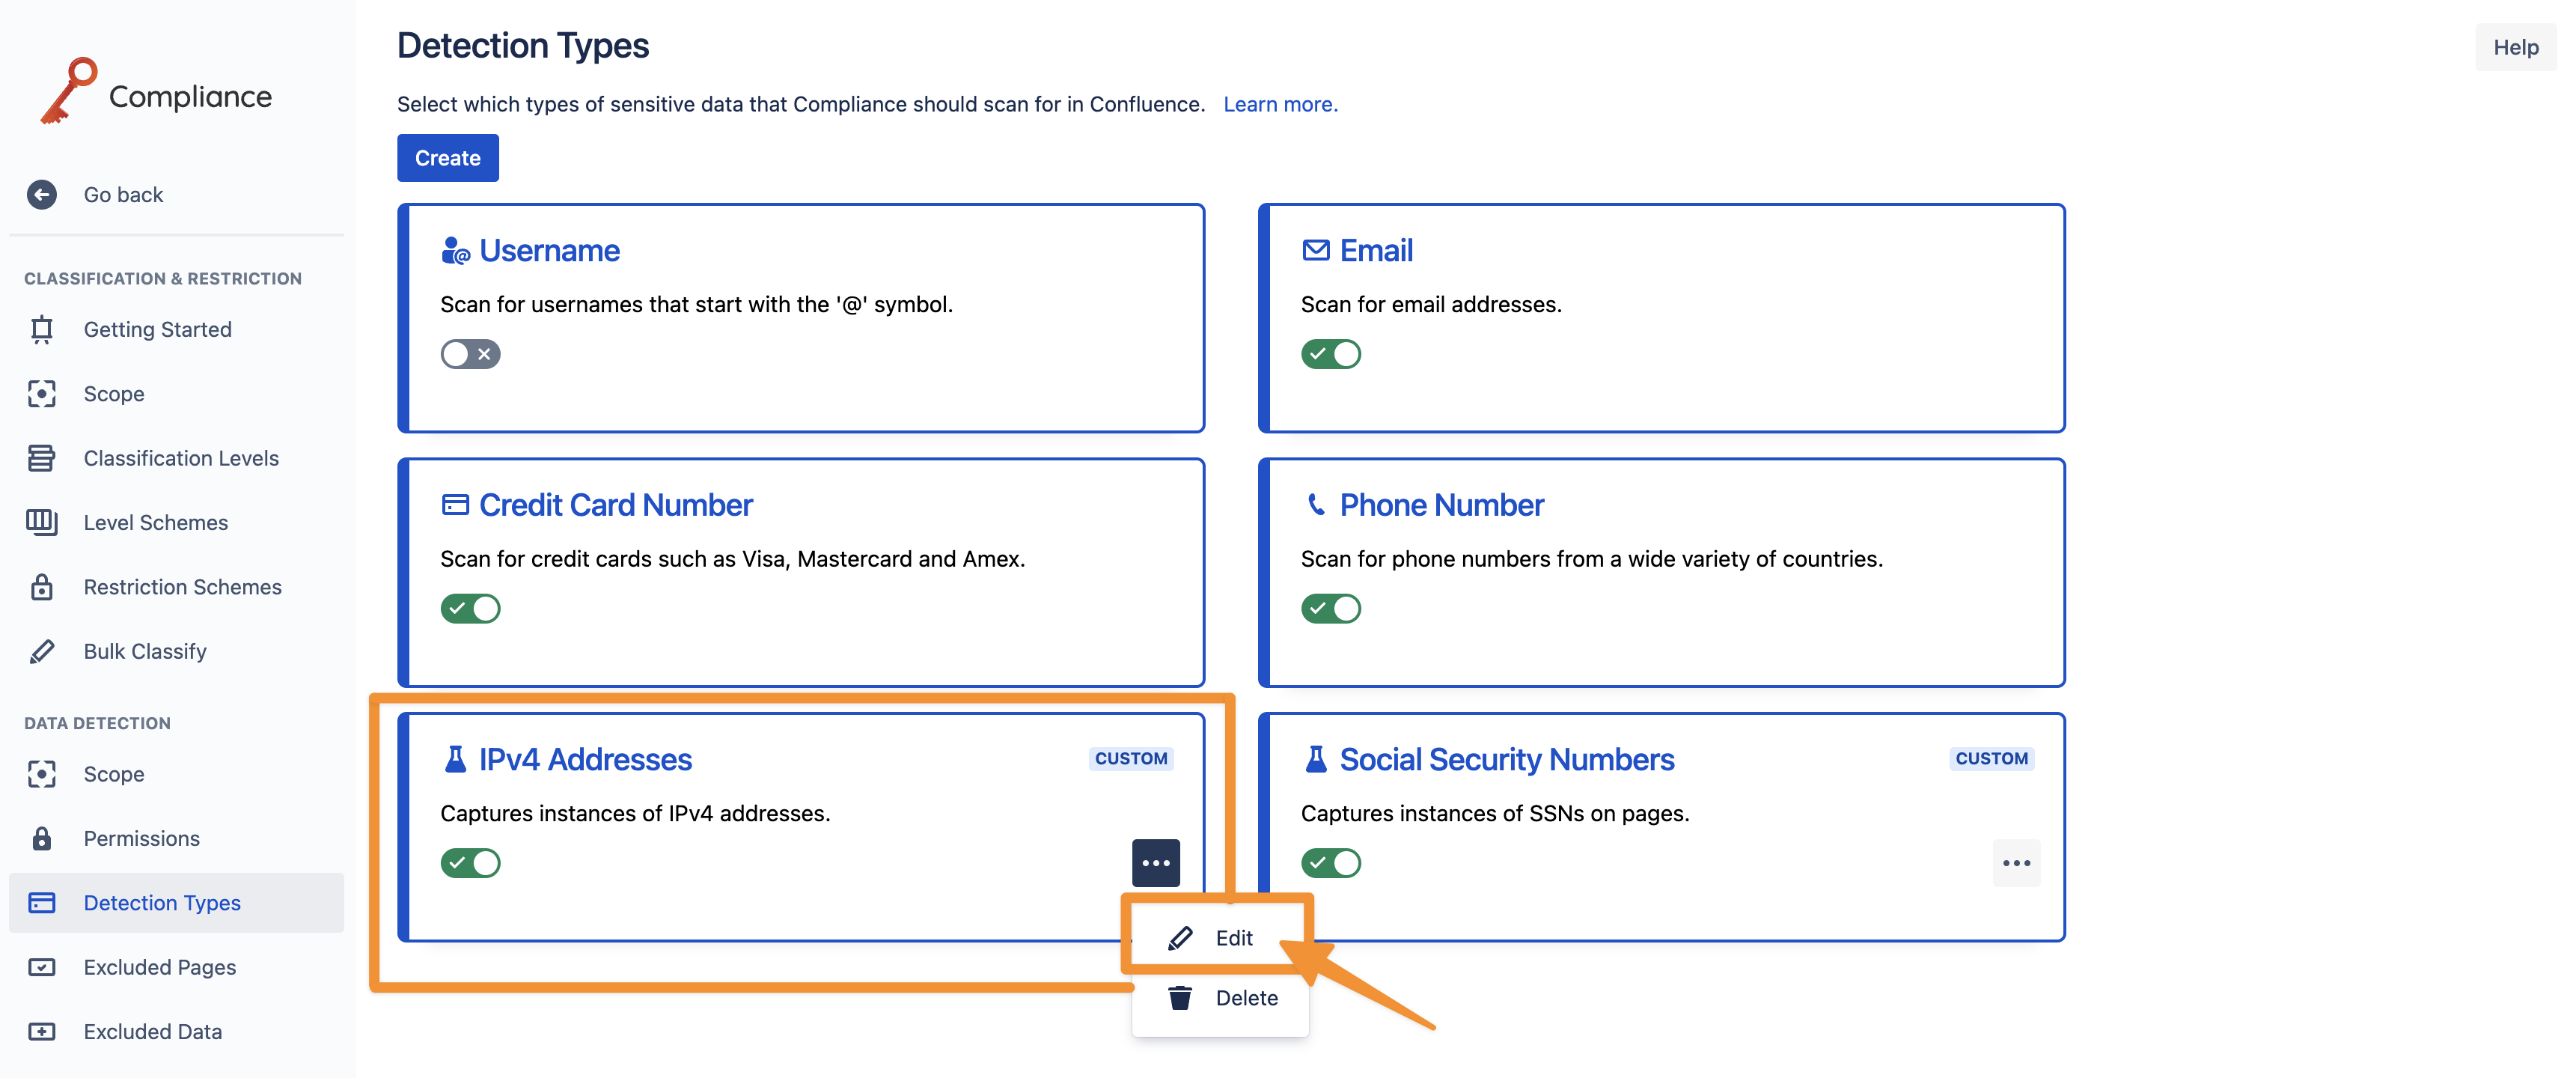
Access the Edit section of your custom detection type
A pop-up window will appear, allowing you to modify all the fields of the detection type.
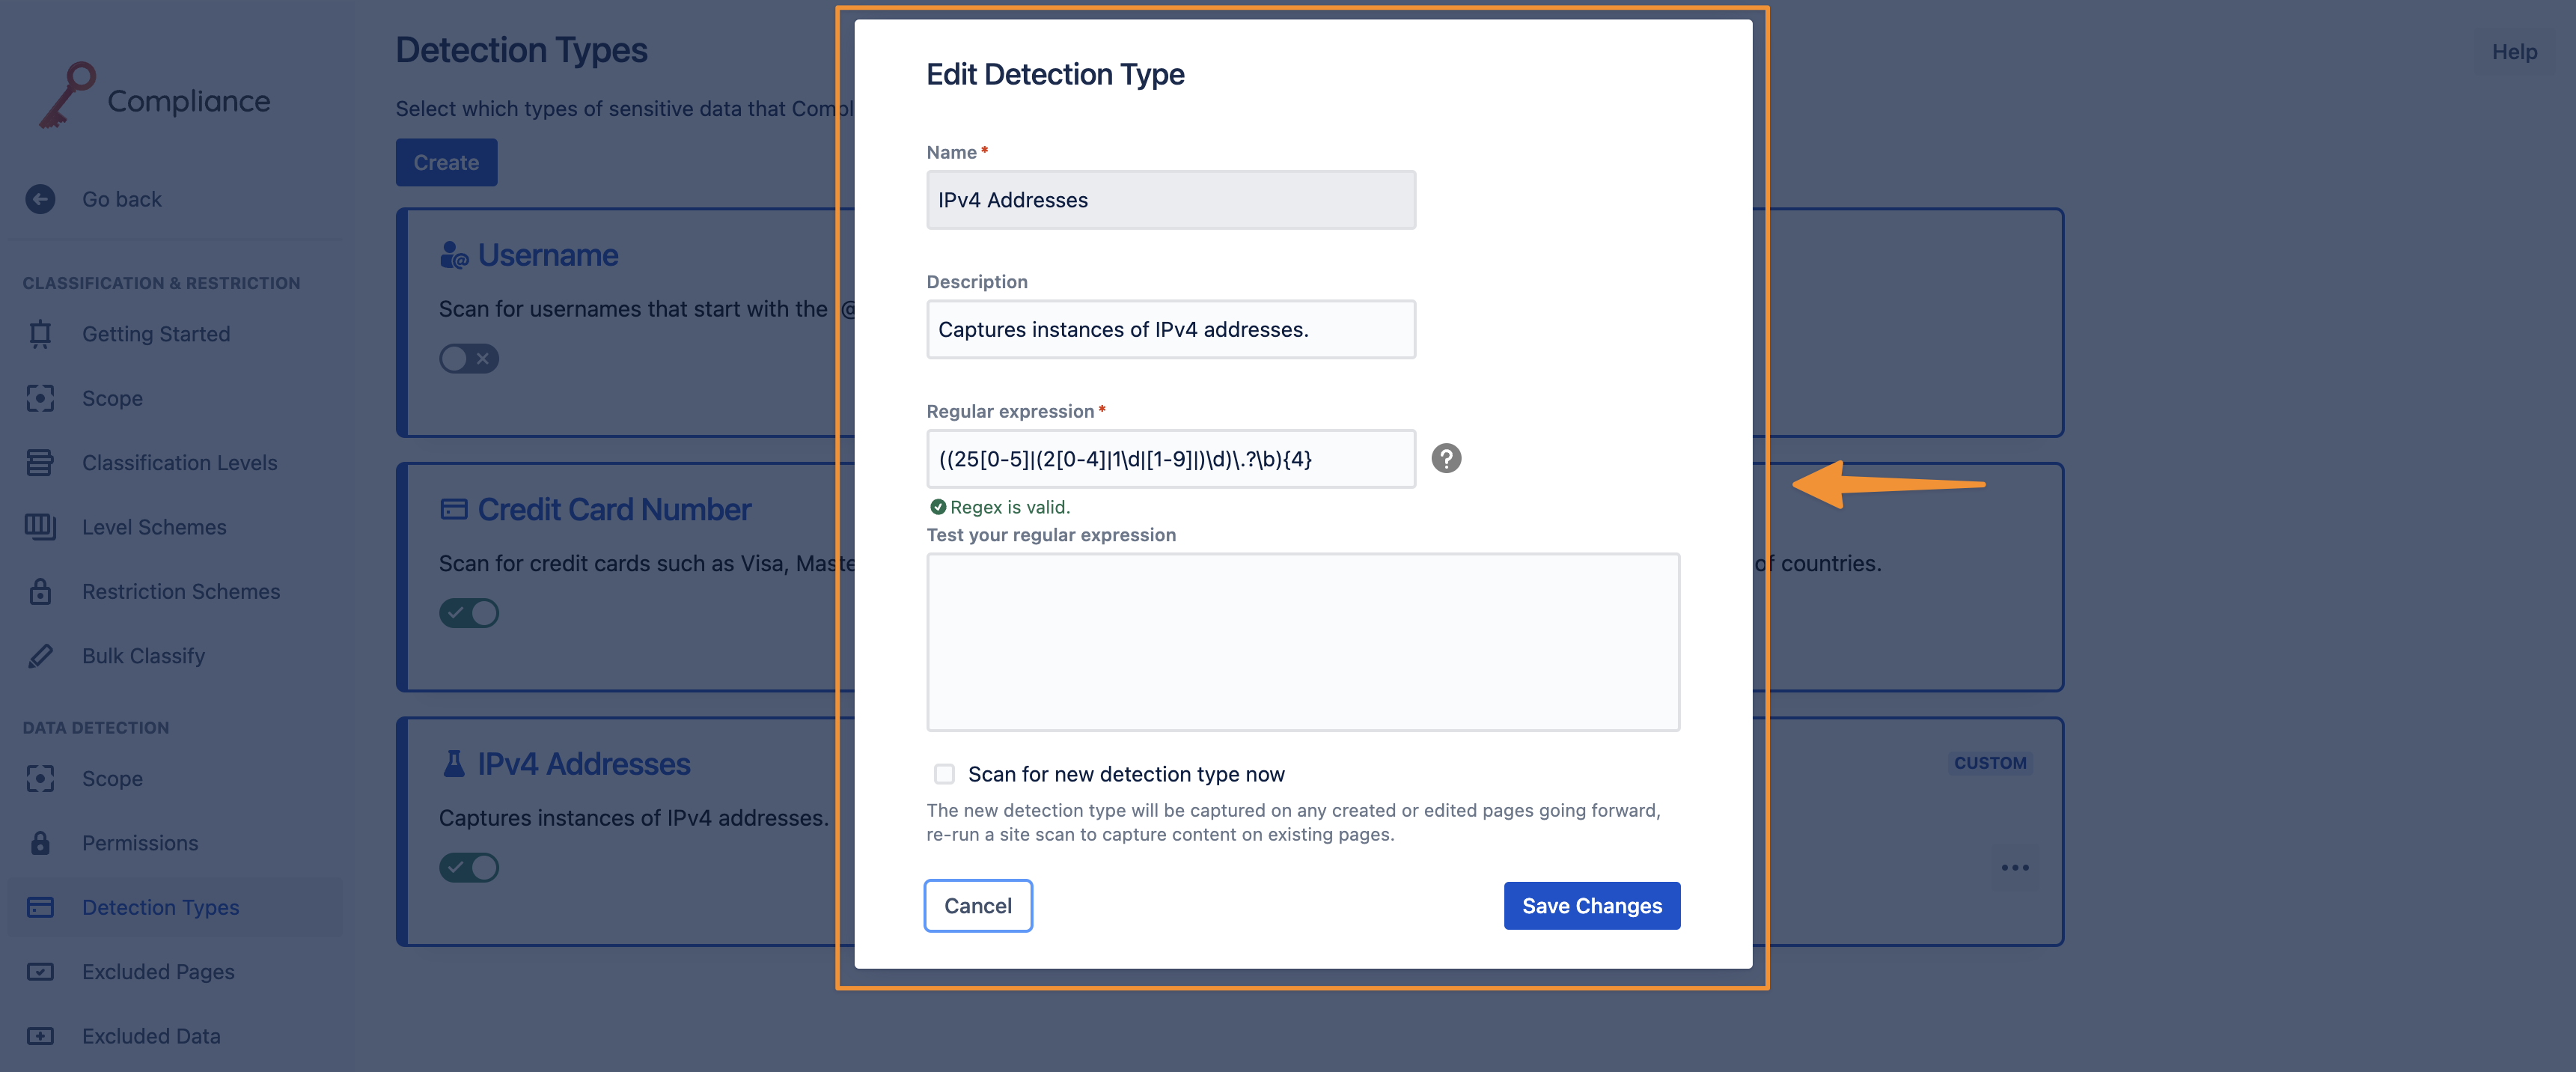
Easily modify your custom detection types
If data detection is enabled, you can enable a site-wide detection scan for the modified regular expression by selecting the "Scan for new detection type now" checkbox.
After making your desired changes, click Save Changes to apply the modifications. If you decide not to proceed with the changes, you can click Cancel to close the window.
When you modify a detection type's regular expression, detection results associated with the old pattern will be deleted.
Please note: If you choose not to activate the "Scan for new detection type now" checkbox, patterns with the modified regular expression on existing pages will not be detected unless a site-wide scan occurs in the future or the existing pages are updated.
Delete a Custom Detection Type
To delete a custom detection type, first navigate to the Detection Types page. Locate the custom detection type you wish to delete and access its options through the ... menu and click Delete.
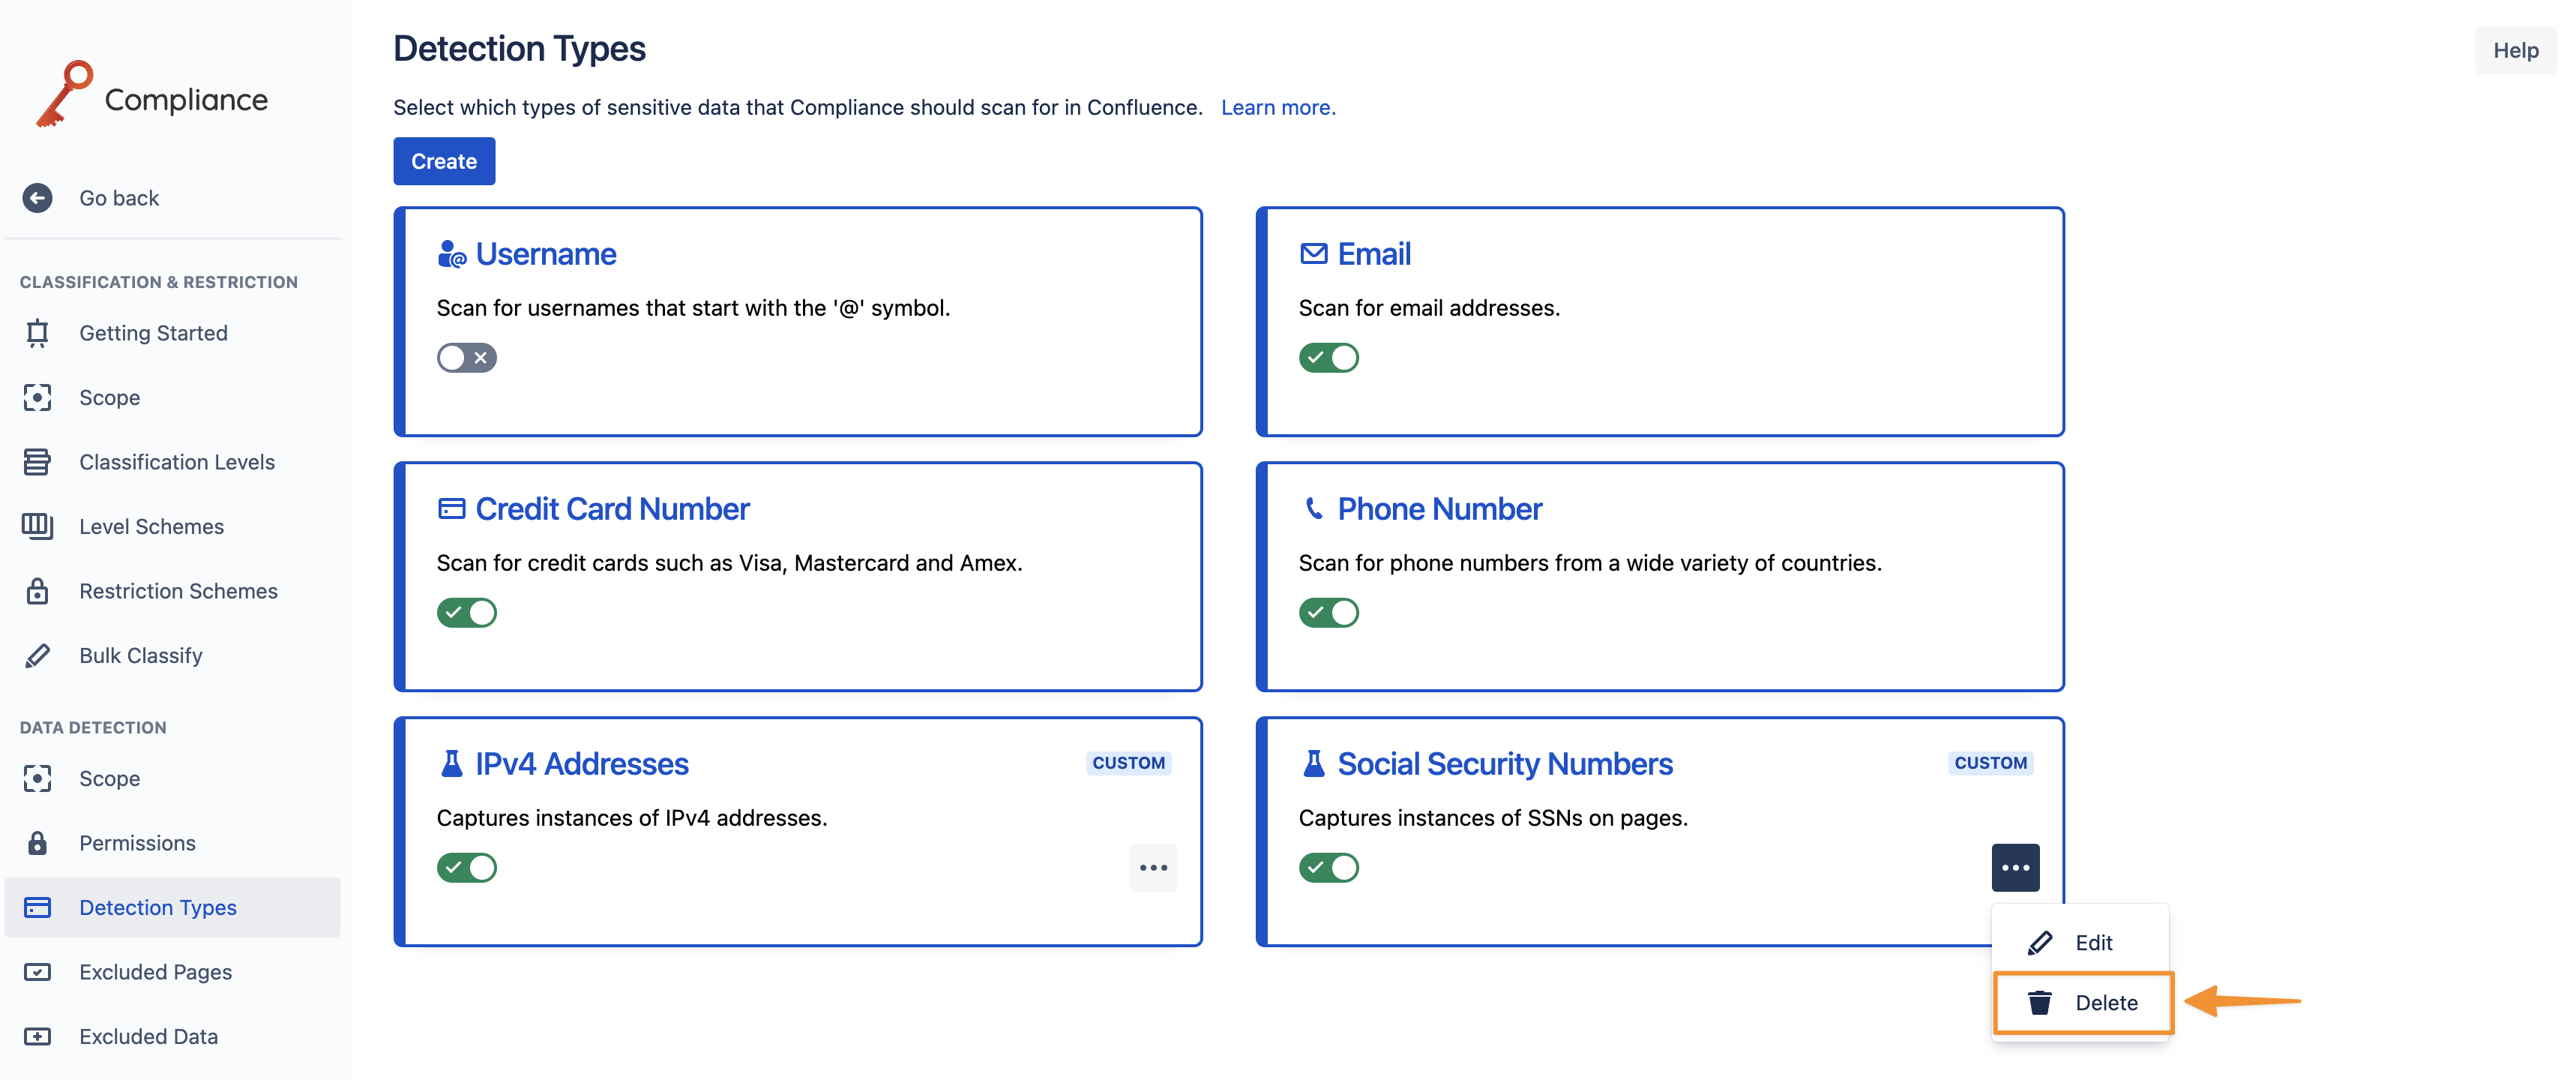
Select Delete on your custom detection type
A confirmation window will appear to confirm the deletion.

You need to provide confirmation before deleting a custom detection type
Deleting a custom detection type will result in the destruction of all detection results associated with that type. Ensure you are certain about this action before proceeding.
To proceed with the deletion, click Delete on the confirmation window. If you decide not to delete the detection type, you can click Cancel to abort the operation.
Need support? We’re here to help 🧡
If you have any questions about Compliance or would like to speak with us, please don’t hesitate to reach out to our Customer Support team.
%20v2.png)