-20250819-084018.svg)
The Data Center version of Optimizer for Jira contains powerful features that help you merge Custom Fields in your Jira site. In this guide, we’ll explain more about the Custom Field Merging feature and how you can use it to improve the overall state of your Jira site.
🎯 Purpose of Custom Field Merging
As your Jira site grows over time, you may often encounter two custom fields designed for the same (or similar) purpose and want to merge them—reducing the volume of data, making it easier for users to select the right custom field, and reducing future administration overhead. The desire to merge fields can arise, for example, when assessing similar configurations used across projects in an instance or as part of a larger process to merge multiple Jira instances together.
Optimizer’s Custom Field Merging feature can be used to merge 2 custom fields together and bring one of the fields (the Source) into another (the Destination). The configuration of the Destination is modified to be compatible with the Source, and issue values are copied from the Source to the Destination.
🚶♀️ Walkthrough
In this section, we’ll walk you through the custom field merging process which has six phases. We’ll guide you through the entire process, explaining any needed changes, and then perform them after a final review.
Step 1 – Guide
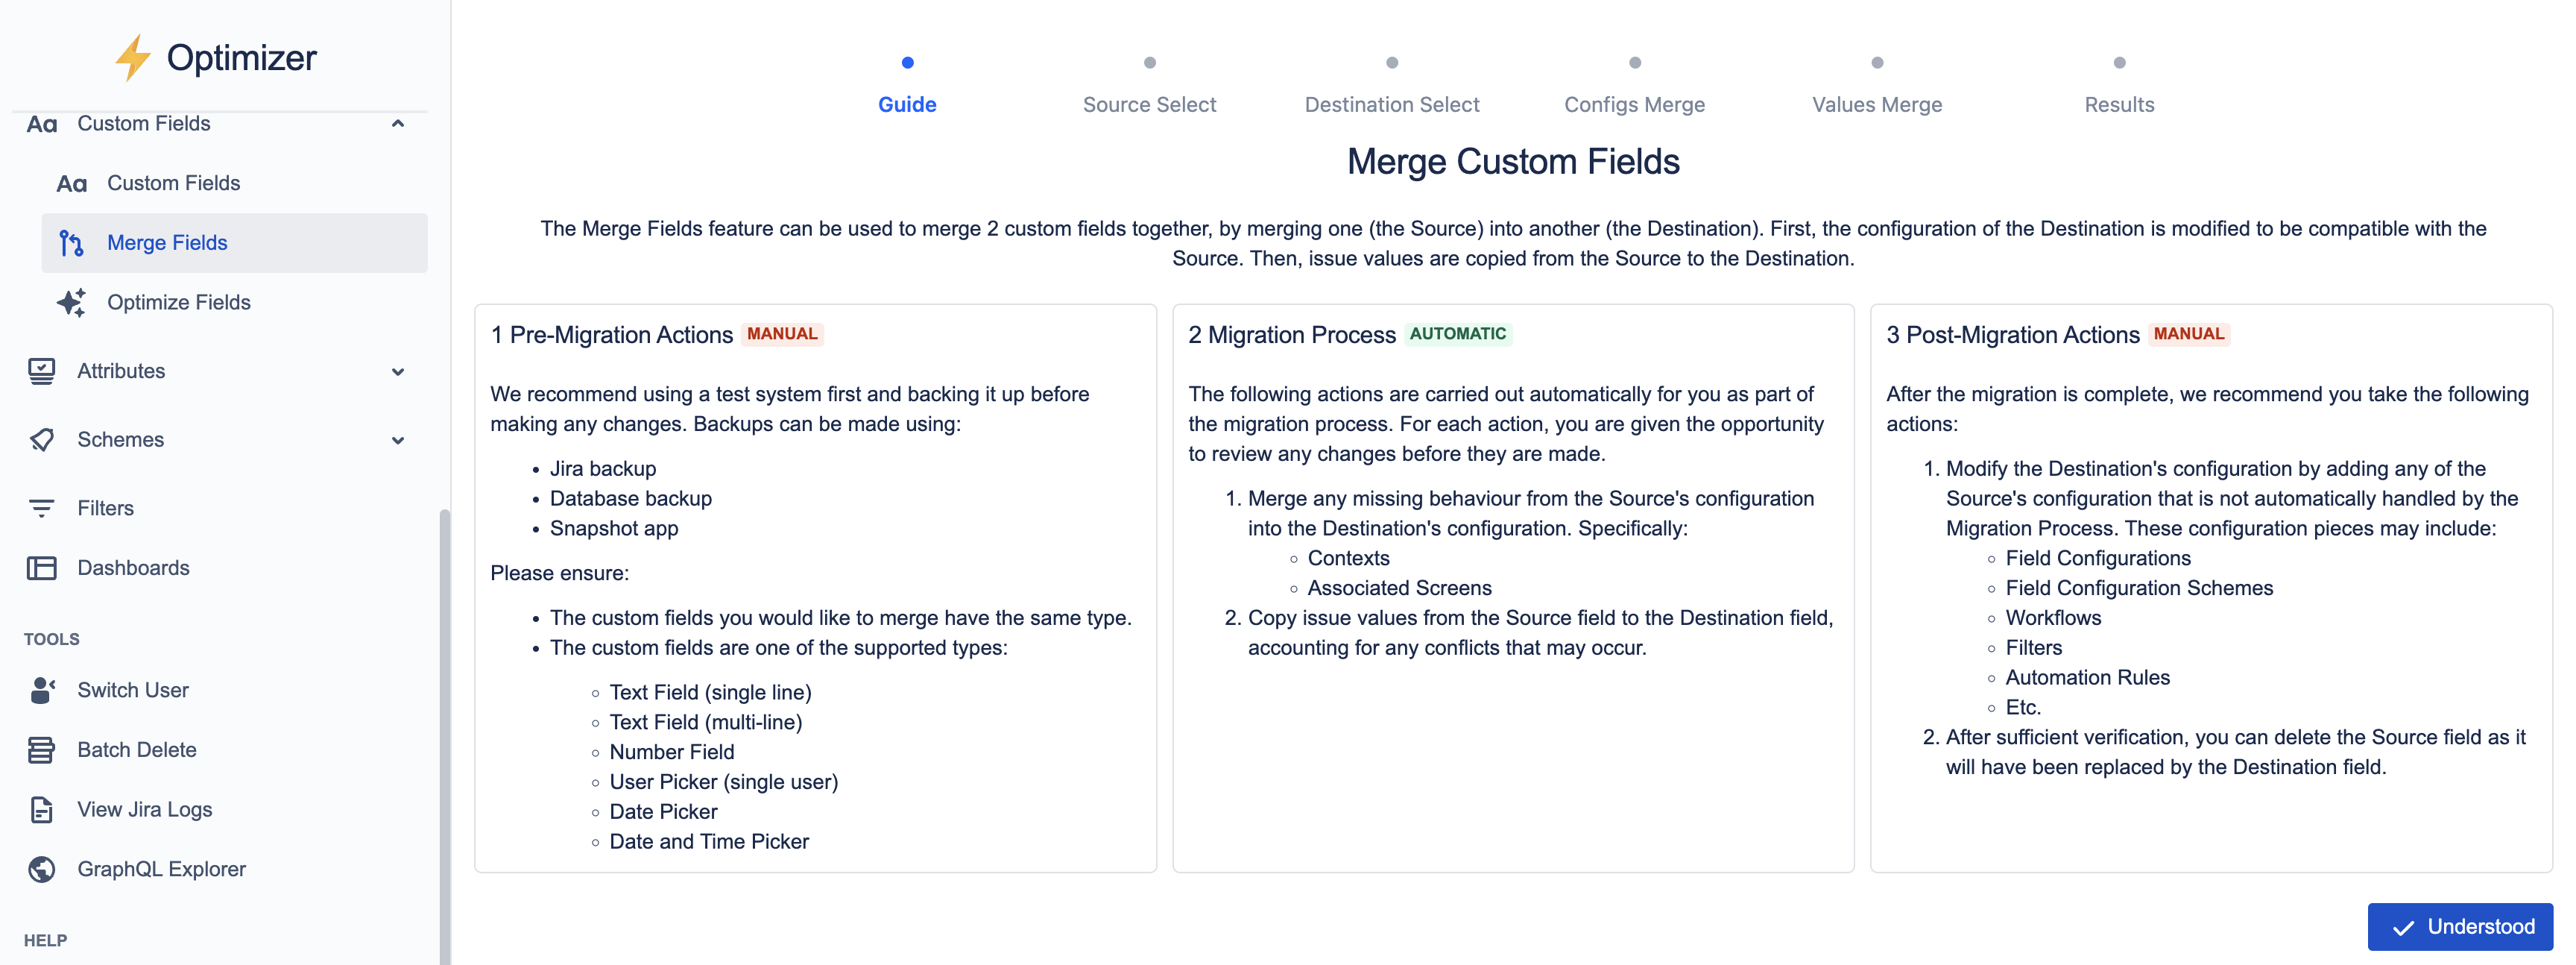
In phase 1, you are provided high-level information outlining the custom field merging process. Notably, the guide explains which tasks are manual (you perform) and which tasks are automatic (Optimizer performs) across the process.
Before the merging process can begin, there are some pre-requisites that must be met:
-
It is recommended that the merge is first performed on a test system (such as a staging/sandbox instance)
-
We also recommend you capture a backup before any custom field merging is completed
-
-
The two custom fields you plan to merge must be of the same type and be one of our supported types:
-
Text Field (single line)
-
Text Field (multi-line)
-
Number Field
-
User Picker (single user)
-
Date Picker
-
Date and Time Picker
-
We plan to add more supported field types and enable the merging of fields with different types in the future.
The actual merge is automatic and consists of two phases:
-
The custom field configurations are merged together. Specifically, the app handles the contexts and associated screens of the fields.
-
Then, Source values are merged into the Destination.
While the Custom Field Merging feature automatically handles contexts and associated screens, we plan to add support for automatically merging more relevant configuration items in the future, such as field configurations, workflows, filters, automation rules, etc.
If you plan on removing the Source field, there are a few post-merge steps you should undertake. First, any configuration items not handled for you automatically should be considered. For instance, if the Source was being used on any workflows, you may wish to update those workflows to use the Destination. Once you are satisfied that the Destination is fully configured and can replace the Source, you can delete the Source field.
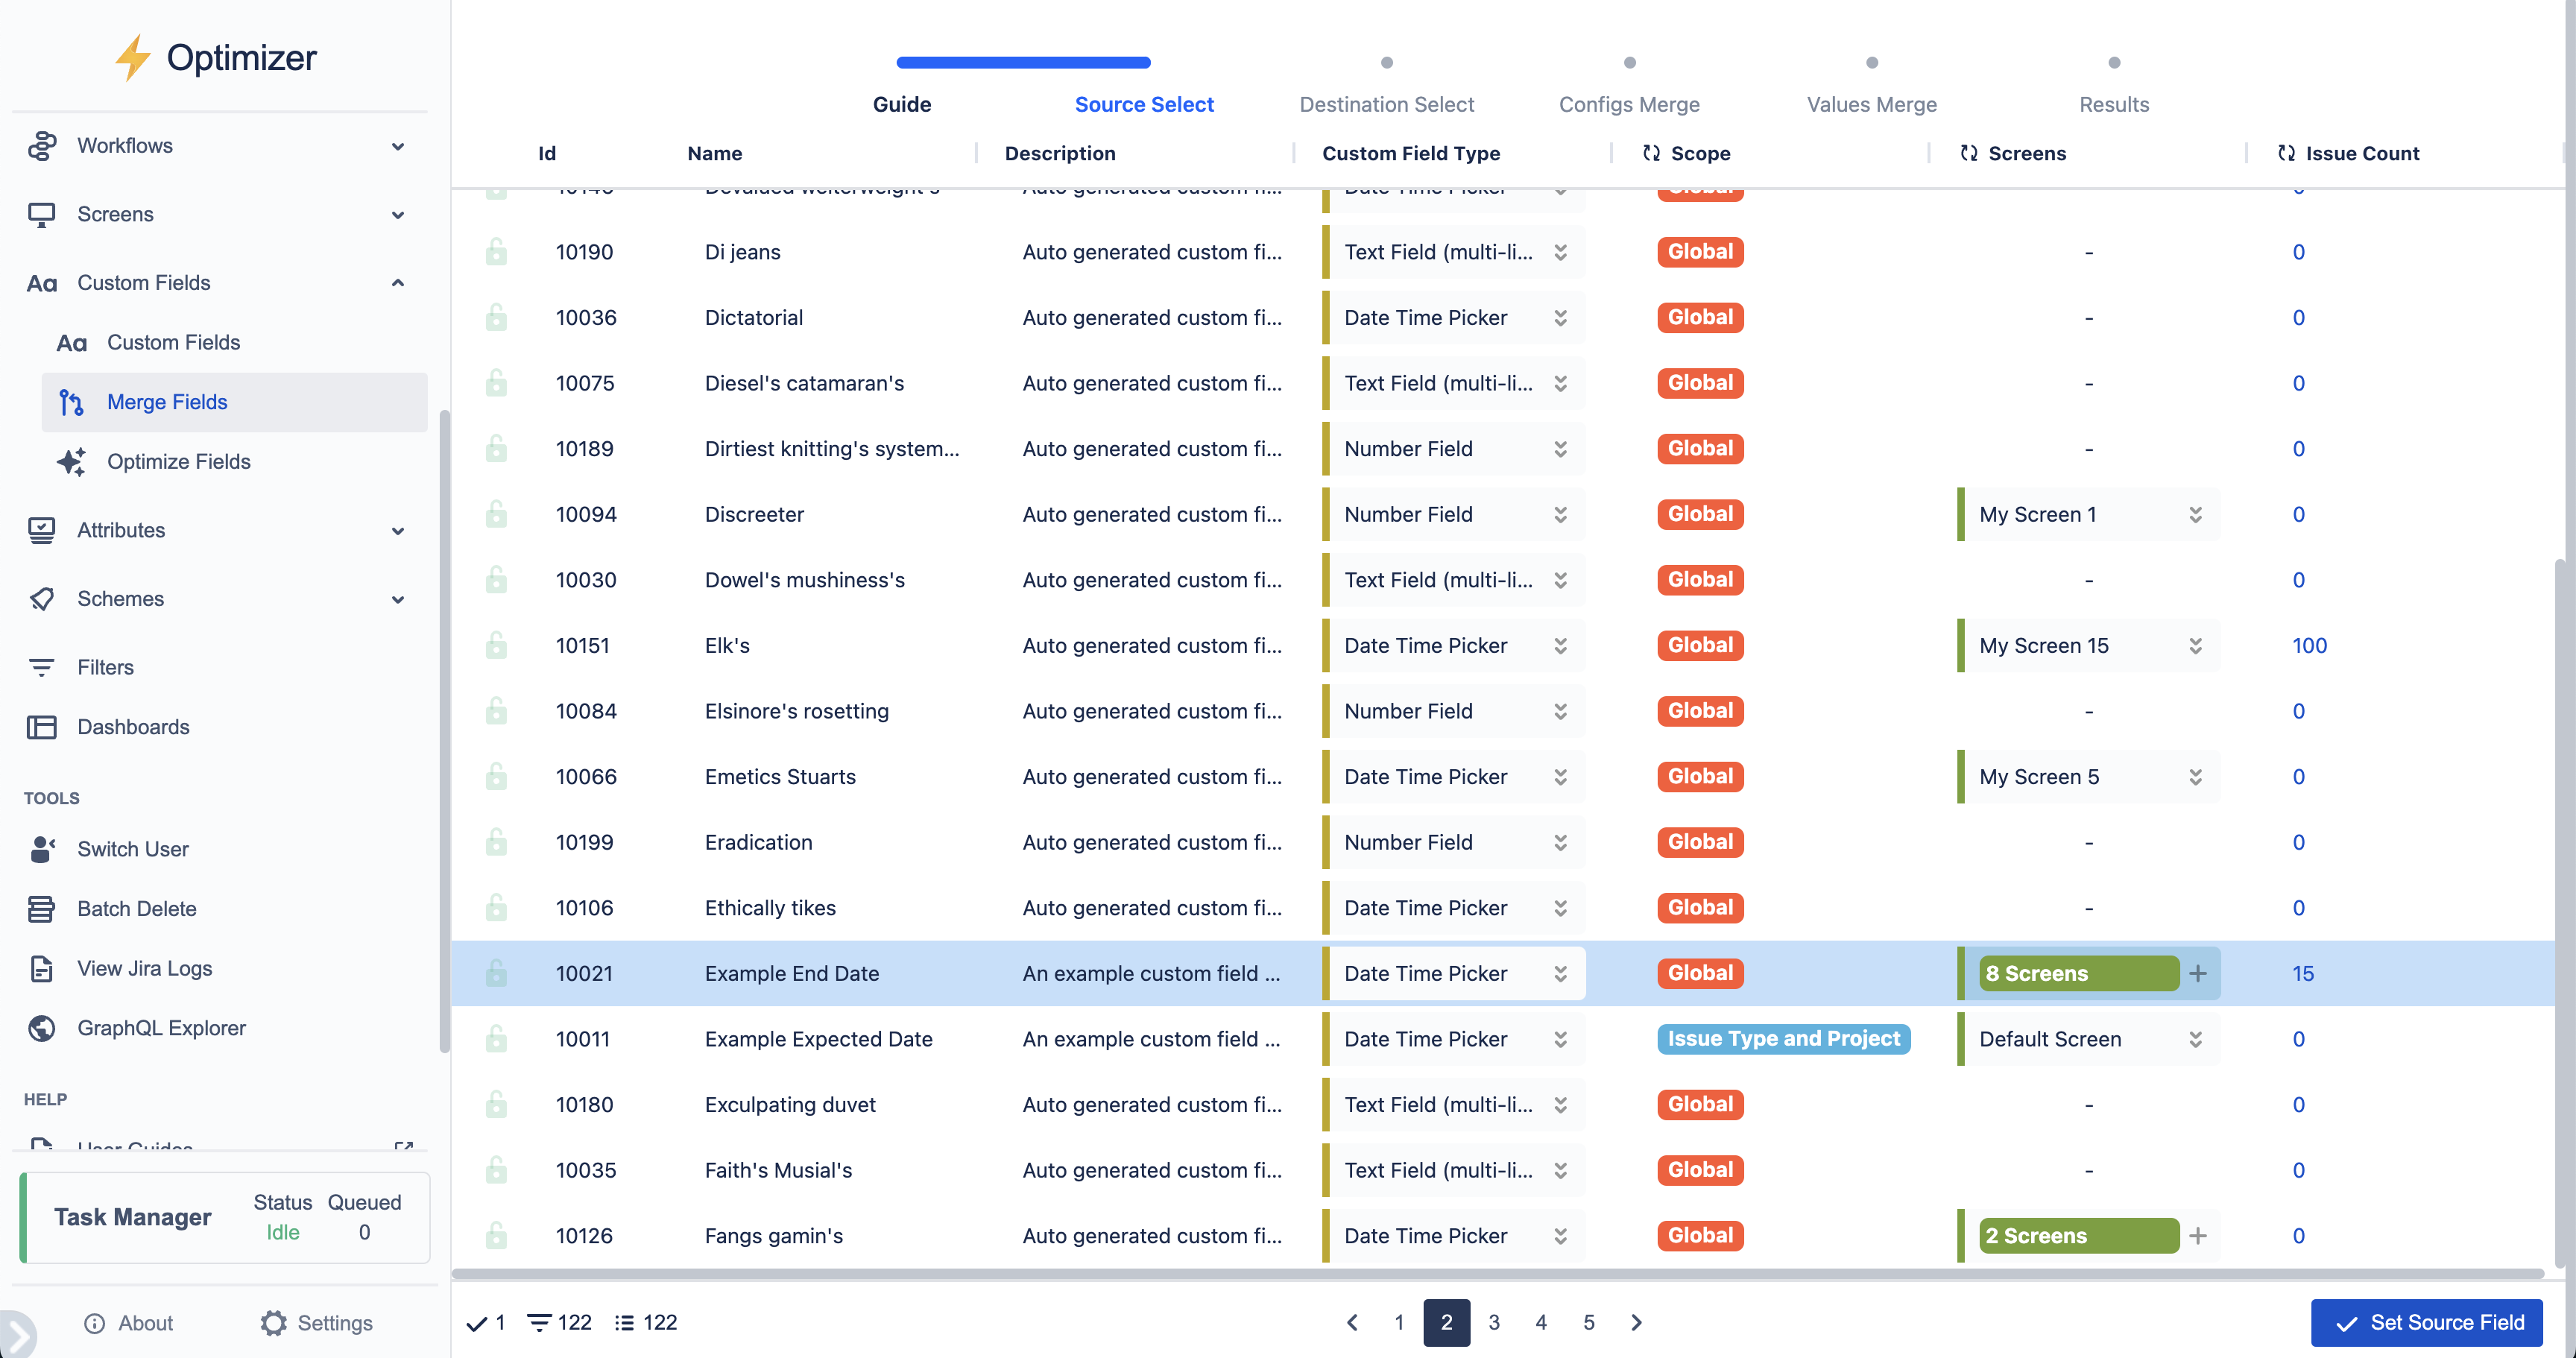
Step 2 – Selecting the Source field
After phase 1 (Guide), you will see a smart table showing all of the custom fields in your Jira site that Optimizer can support merging. You can use this table to find relevant details about each custom field, deep-dive into any of interest, and assess its configuration and linkage to other Jira objects.
Once you have found a field you wish to replace via a merge, select it (by clicking on its row) and move on to the next step.
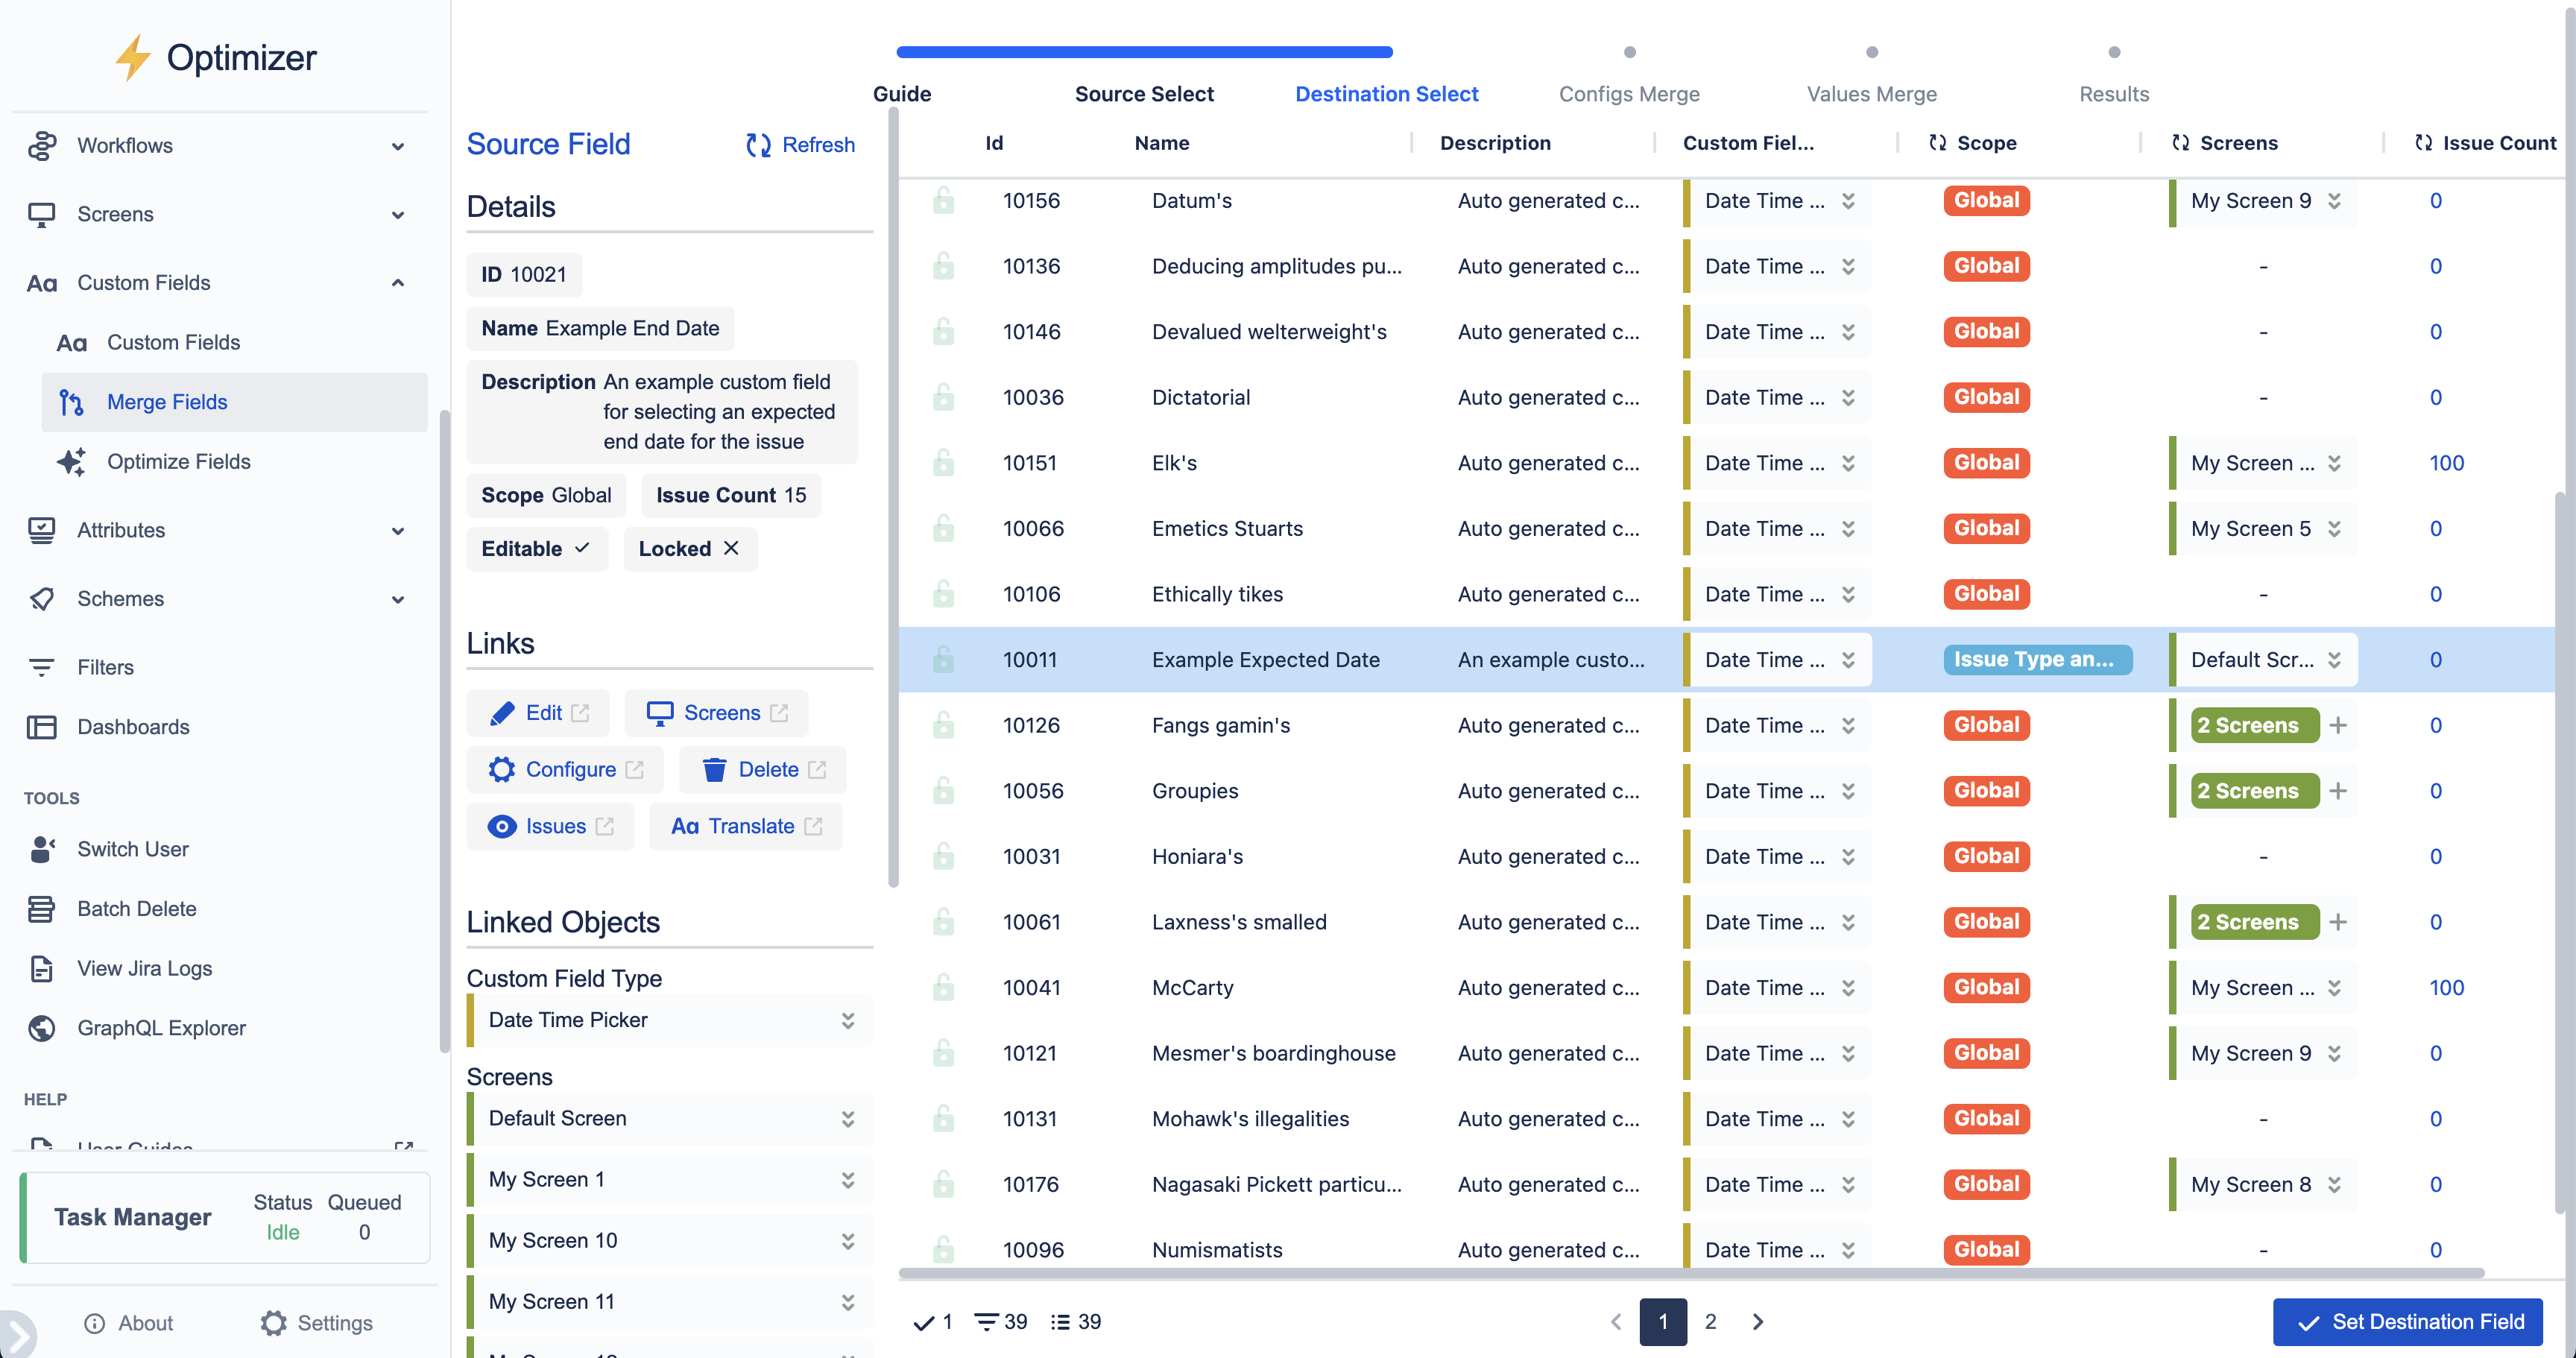
Step 3 – Selecting the Destination field
Next, you will be presented with another table listing the custom fields you can merge the selected Source field into (i.e., fields with the same type as the Source). For convenience, details of the Source field are retained and presented alongside the table.
Once you have found a Destination field that you wish to merge the Source field into, select it (by clicking on its row) and move on to the next step.
Step 4 – Merging configurations
The highly requested Custom Field Configuration Merging feature is coming soon!
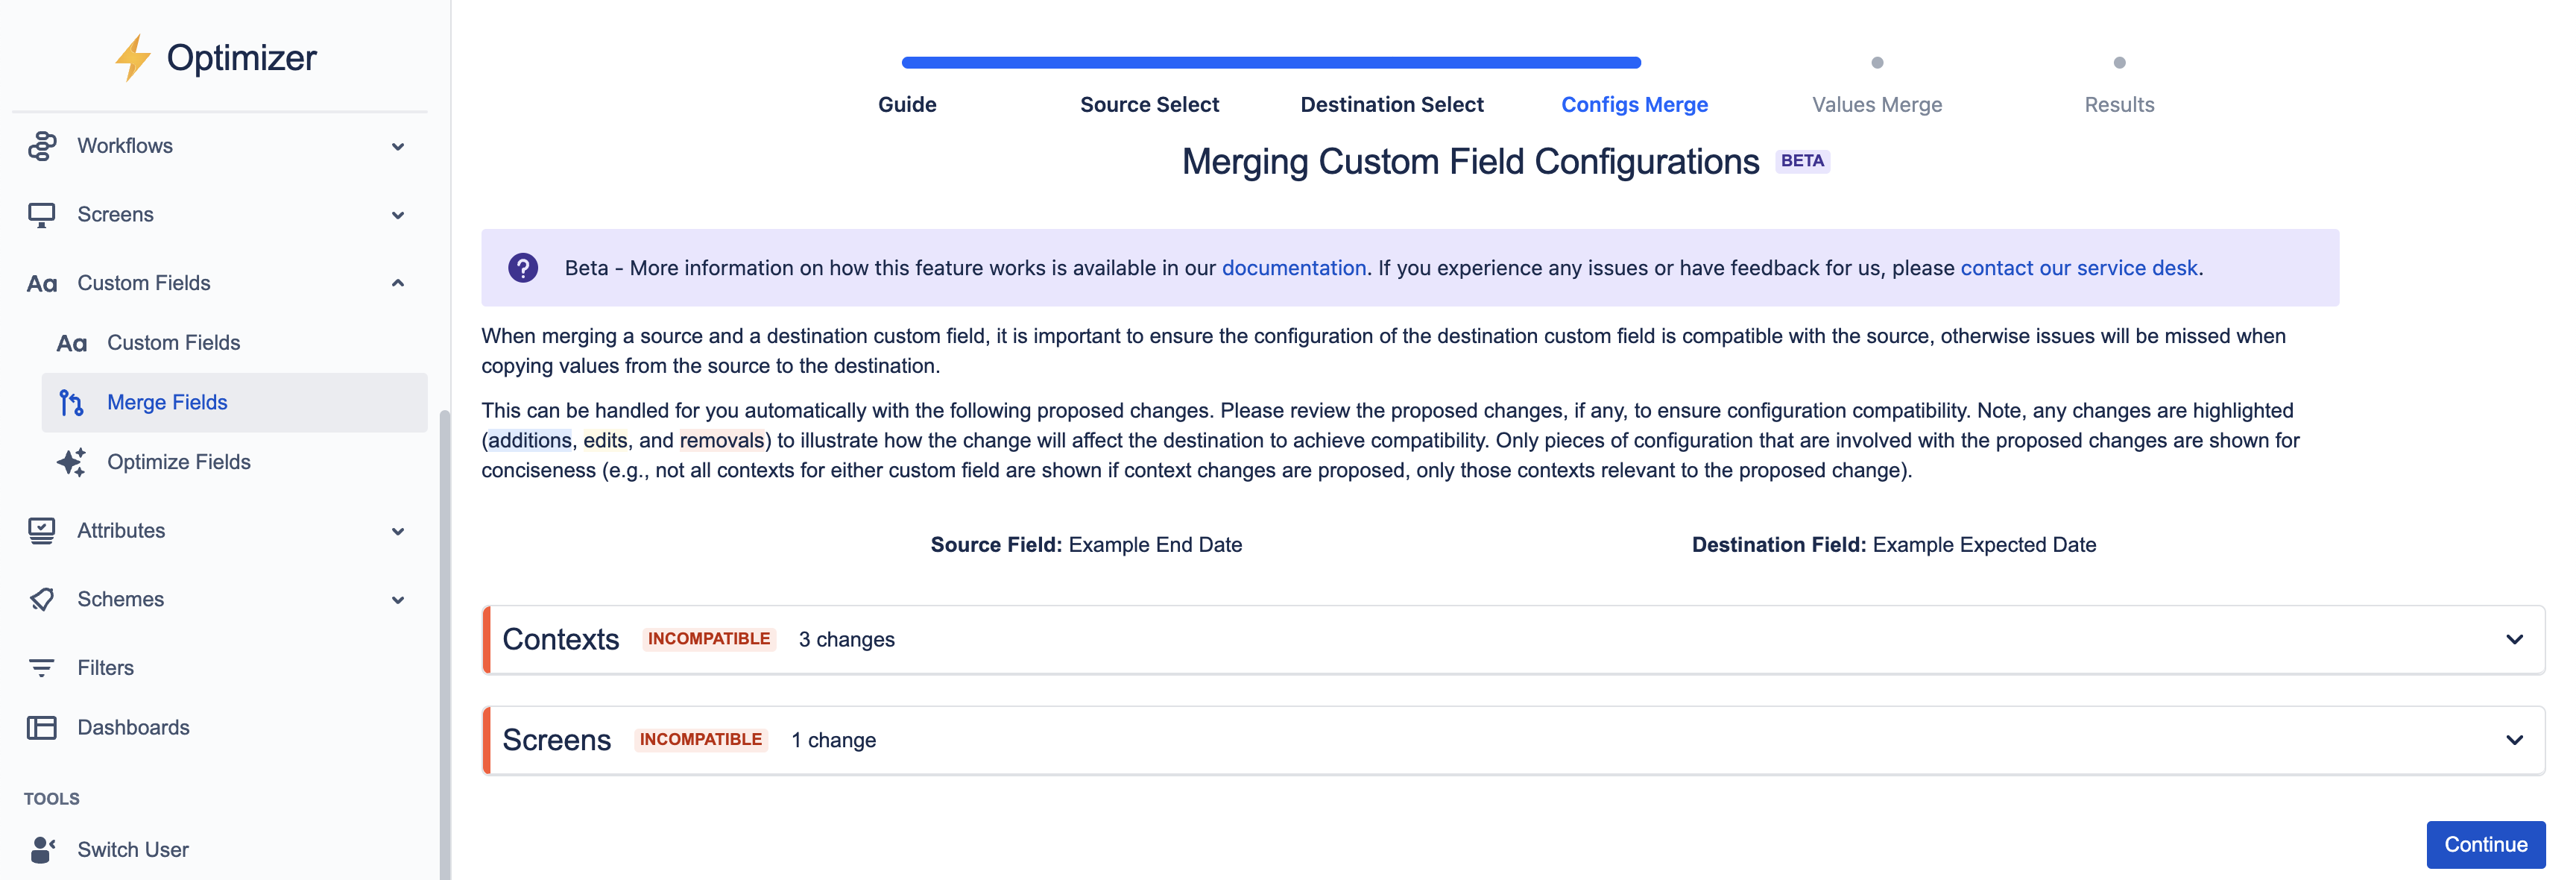
Having selected a Source and Destination field, the next step is to reconcile the configurations of the two fields if required (i.e., the Destination’s configuration is not yet compatible with the Source).
This configuration merging feature can be used to automatically merge Source contexts and associated screens into the Destination. The Destination will gain any behavior it is missing from the Source while preserving its existing behavior. By doing this, the Destination will become fully compatible with the Source, meaning it is available on all the same issues as the Source. This will ensure that no Source issues are skipped when we copy their values to the Destination in the next step.
It is assumed that the Destination should incorporate any and all Source behavior it is missing to fully replace the Source field in the instance without losing any Source issue values or behavior.
If you want the Destination’s configuration to remain unaltered, you can ignore any suggested changes and skip to the next step. Note that all configuration changes must be reviewed before they are applied, so you can pick and choose which behaviors from the Source the Destination should receive if this control is desired.
The feature will copy Source values to the Destination for all shared issues where the Source and Destination are configured to be used. If proposed changes are skipped, then any issues where the Source is used, and the Destination is not configured for use will be skipped.
Initially, you will be shown the number of proposed changes needed to make the Destination fully compatible with the Source (i.e., missing behaviors and how they can be added to the Destination). The proposed changes are separated by configuration type — currently, contexts, and associated screens.
Contexts
Custom fields can have many contexts, and comparing the contexts of two custom fields can reveal various levels of overlapping and disparate configuration. When trying to make the set of Destination contexts compatible with the Source contexts, the task can grow complex for even two reasonably simple custom fields.
To make the process digestible and understandable, we present a set of changes, each of which adds just one missing piece of configuration to the Destination contexts that are in the Source contexts.
To this end, we leverage two core rules about custom field contexts: each custom field can have at most one global (i.e., all projects) context, and every project may appear in at most one context for a given custom field. As such, we tie each change to a project (or the special case global-project-scope).
The result is that three types of proposed change can be encountered when a project behavior given by a Source context is missing in the Destination:
-
If the Destination has no relevant context, we can copy the Source context to the Destination.
Copying a context into the Destination
If a context for a given project (or the special global-project-scope) is missing entirely from the Destination’s contexts, then a simple change will be suggested to copy the context from the Source into the Destination.
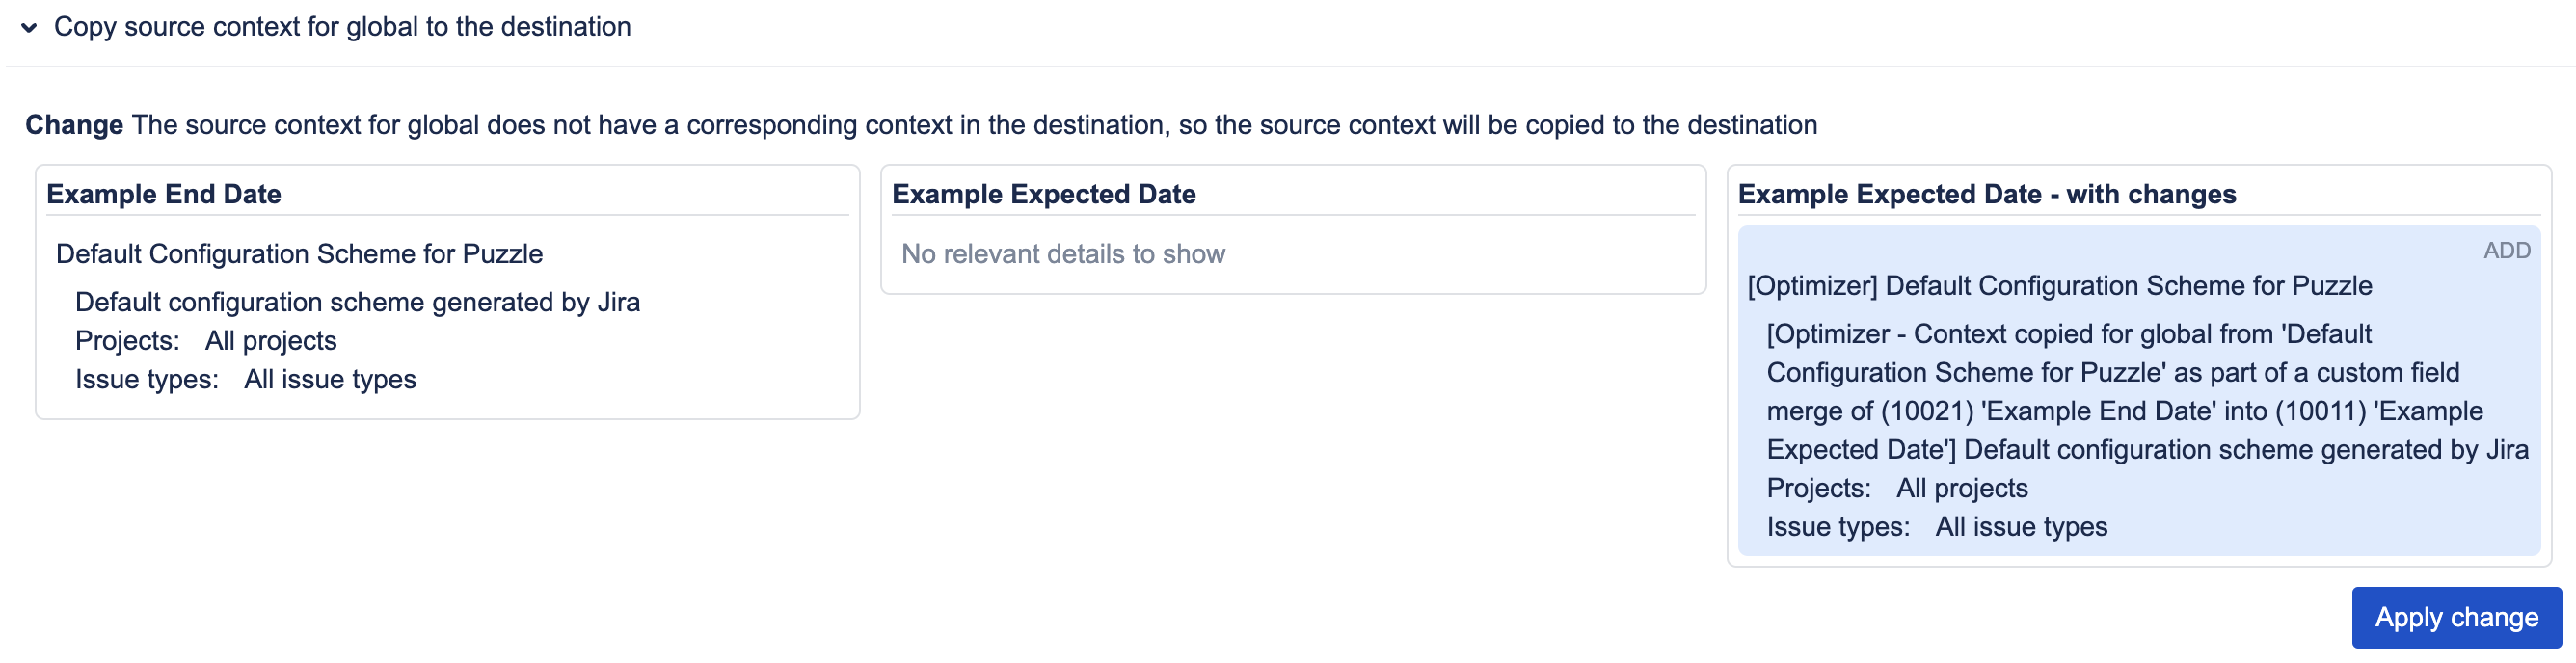
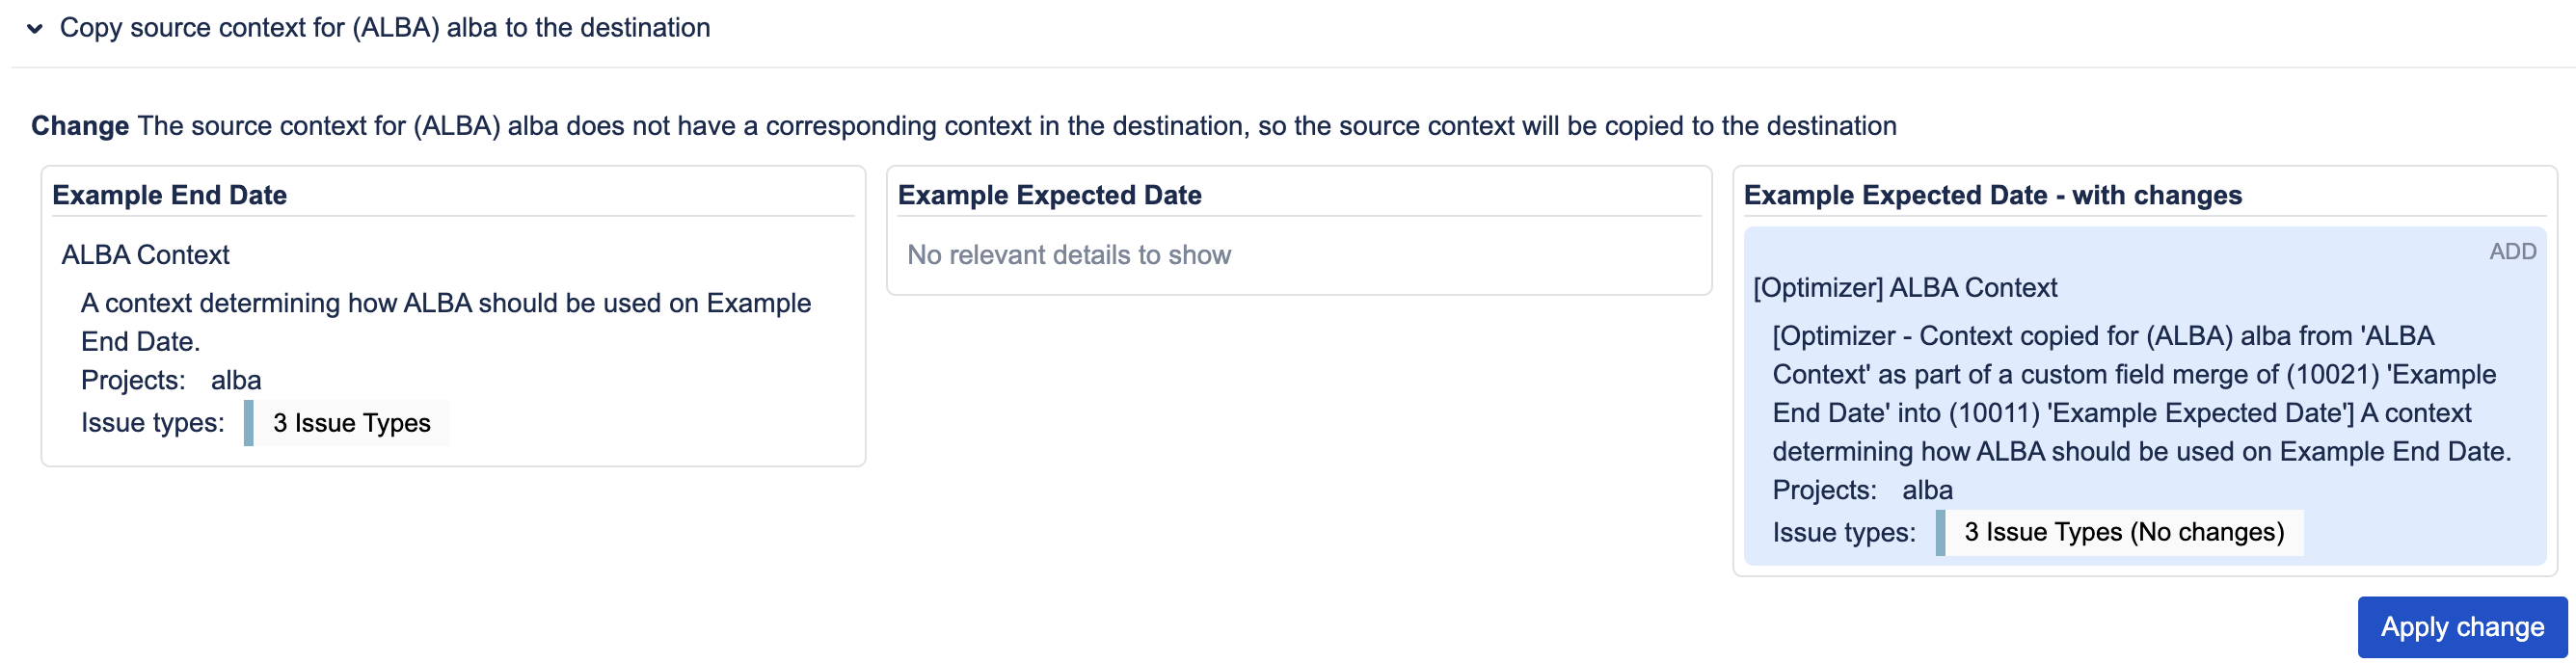
Optimizer will add [Optimizer] tags to the name and description (with an explanation in the latter case) for accountability as to where the auto-generated context originated from.
-
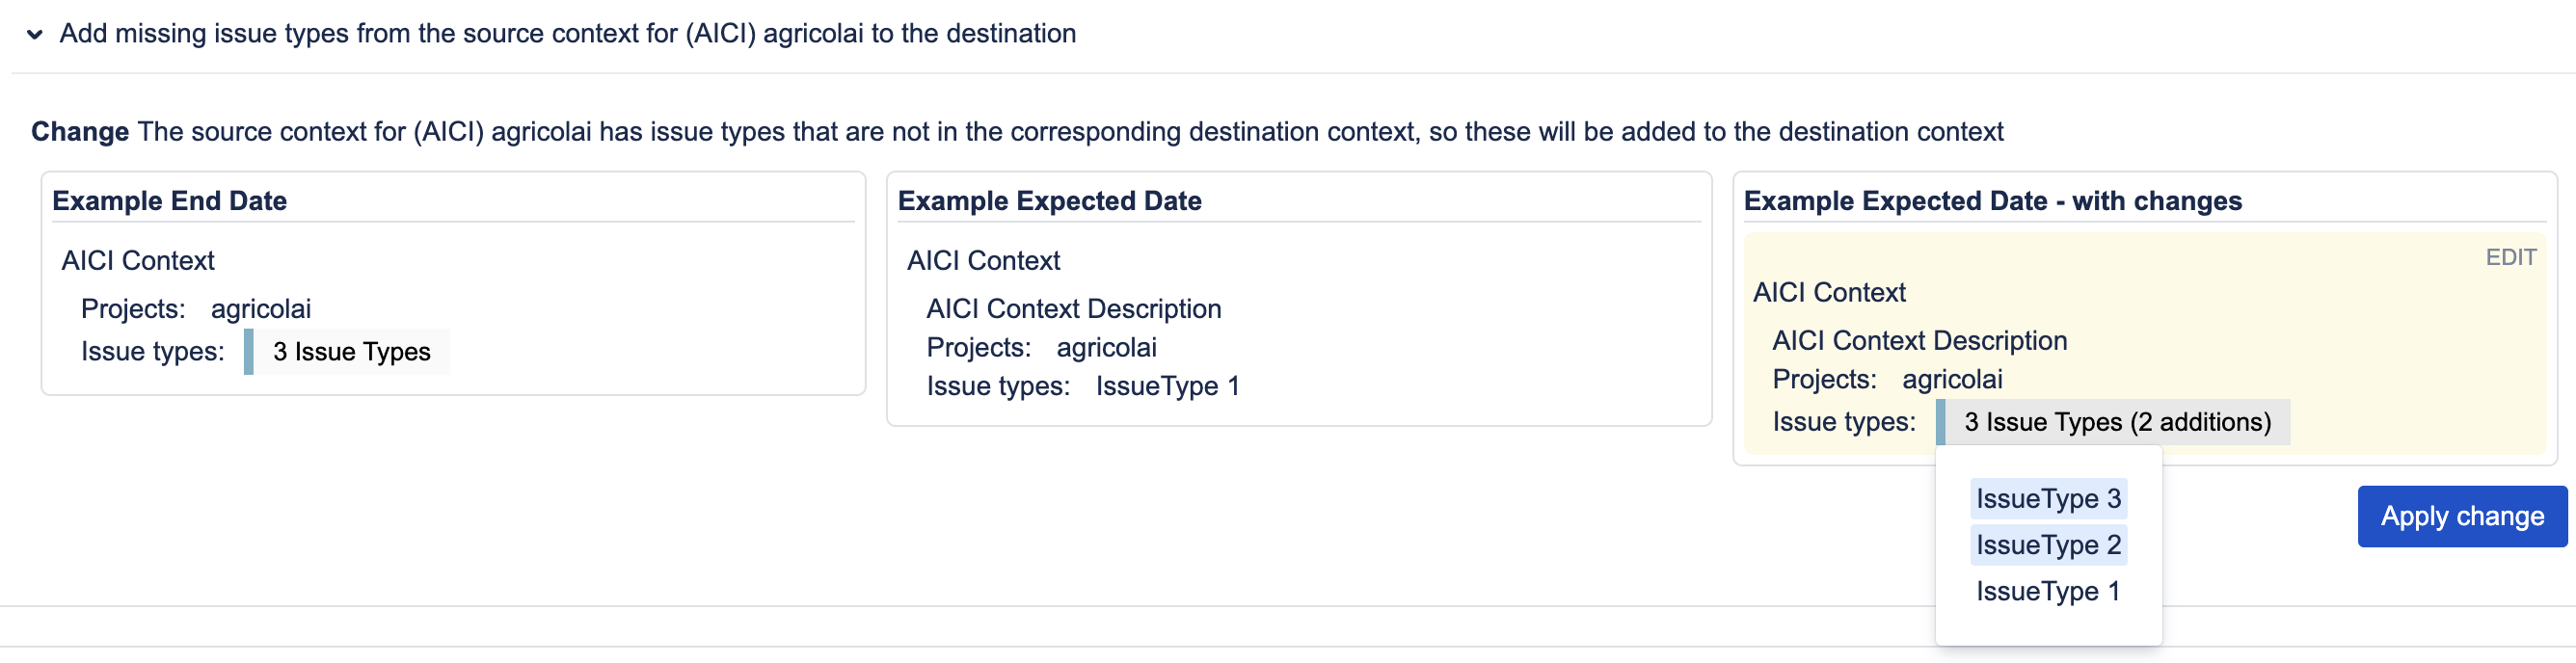
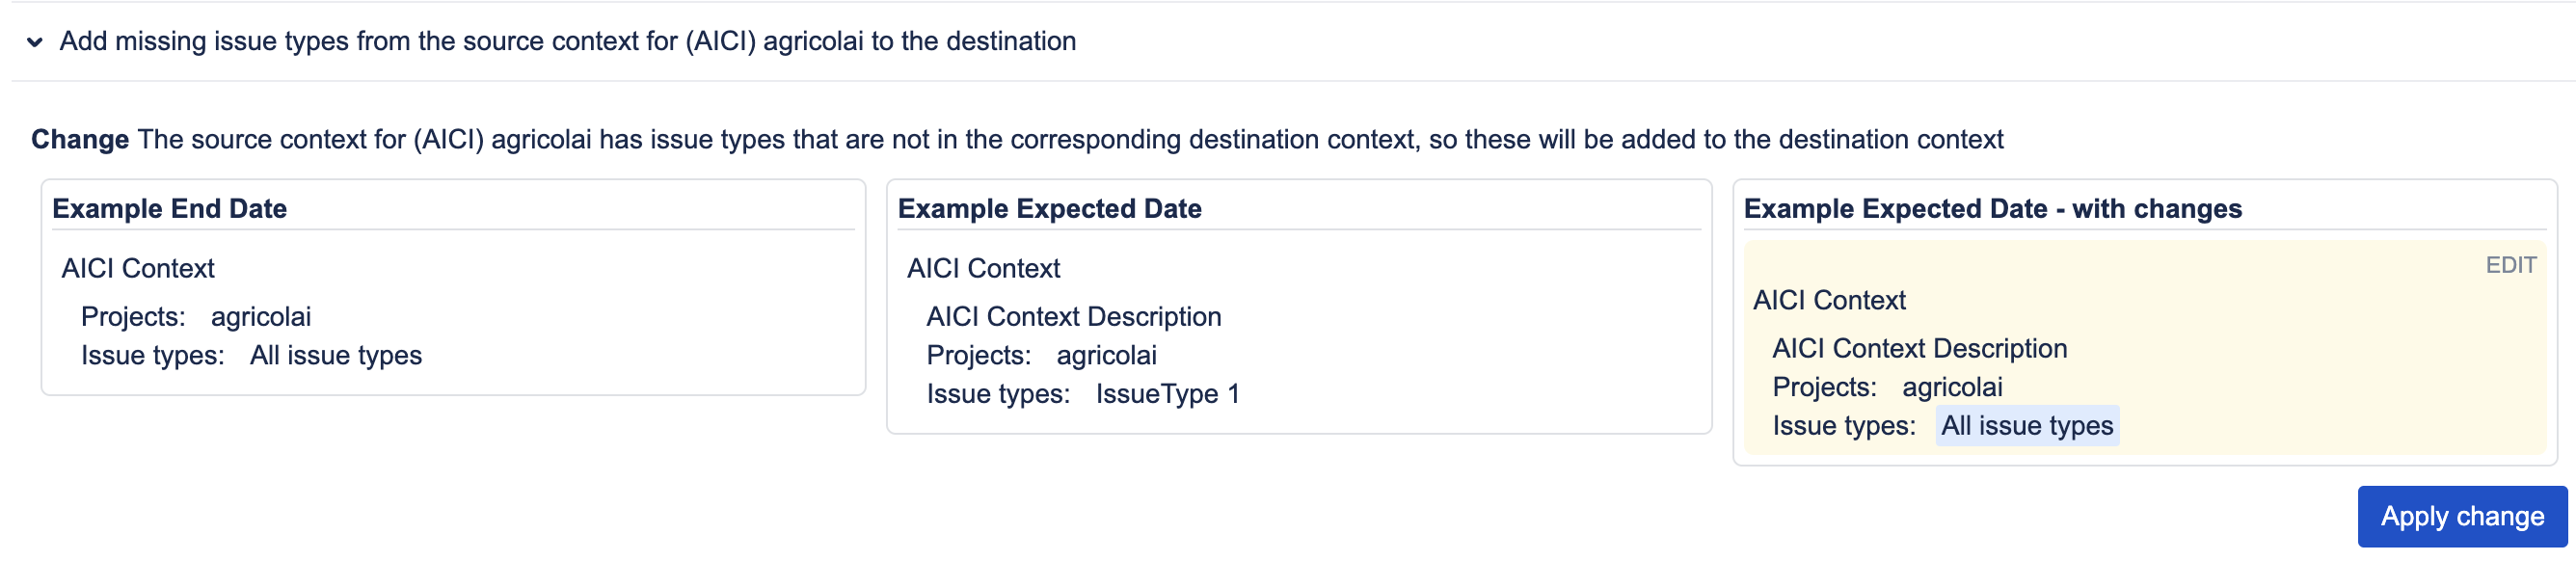
If the Destination has a relevant context, and adding to it won’t affect the existing Destination behavior or introduce any behavior not present in either field, then we add to the Destination context.
Adding to a context in the Destination
In cases where adding in missing behavior would not cause issues (i.e., no new behavior is created that is not present in either field and no existing Destination behavior is lost), then the missing behavior is simply added to the existing context in the Destination.
-
If the Destination has a relevant context, but adding to it would affect the existing Destination behavior or introduce any behavior not present in either field, then we extract a new context in the Destination (which allows us to keep the existing Destination behavior and gain the missing Source behavior as well).
Extracting a context in the Destination
In cases where adding in missing behavior would cause issues (i.e., new behavior created that is not present in either field, or existing Destination behavior is lost), then we extract a new context for the project in the Destination.
To extract a new context, we copy the original context for the project and specify just the given project as the project scope. As we have copied the context in the Destination, all Destination behavior for the project is maintained. Then, as the given project is the only project in scope, any missing behavior is simply added without worry about conflicts.
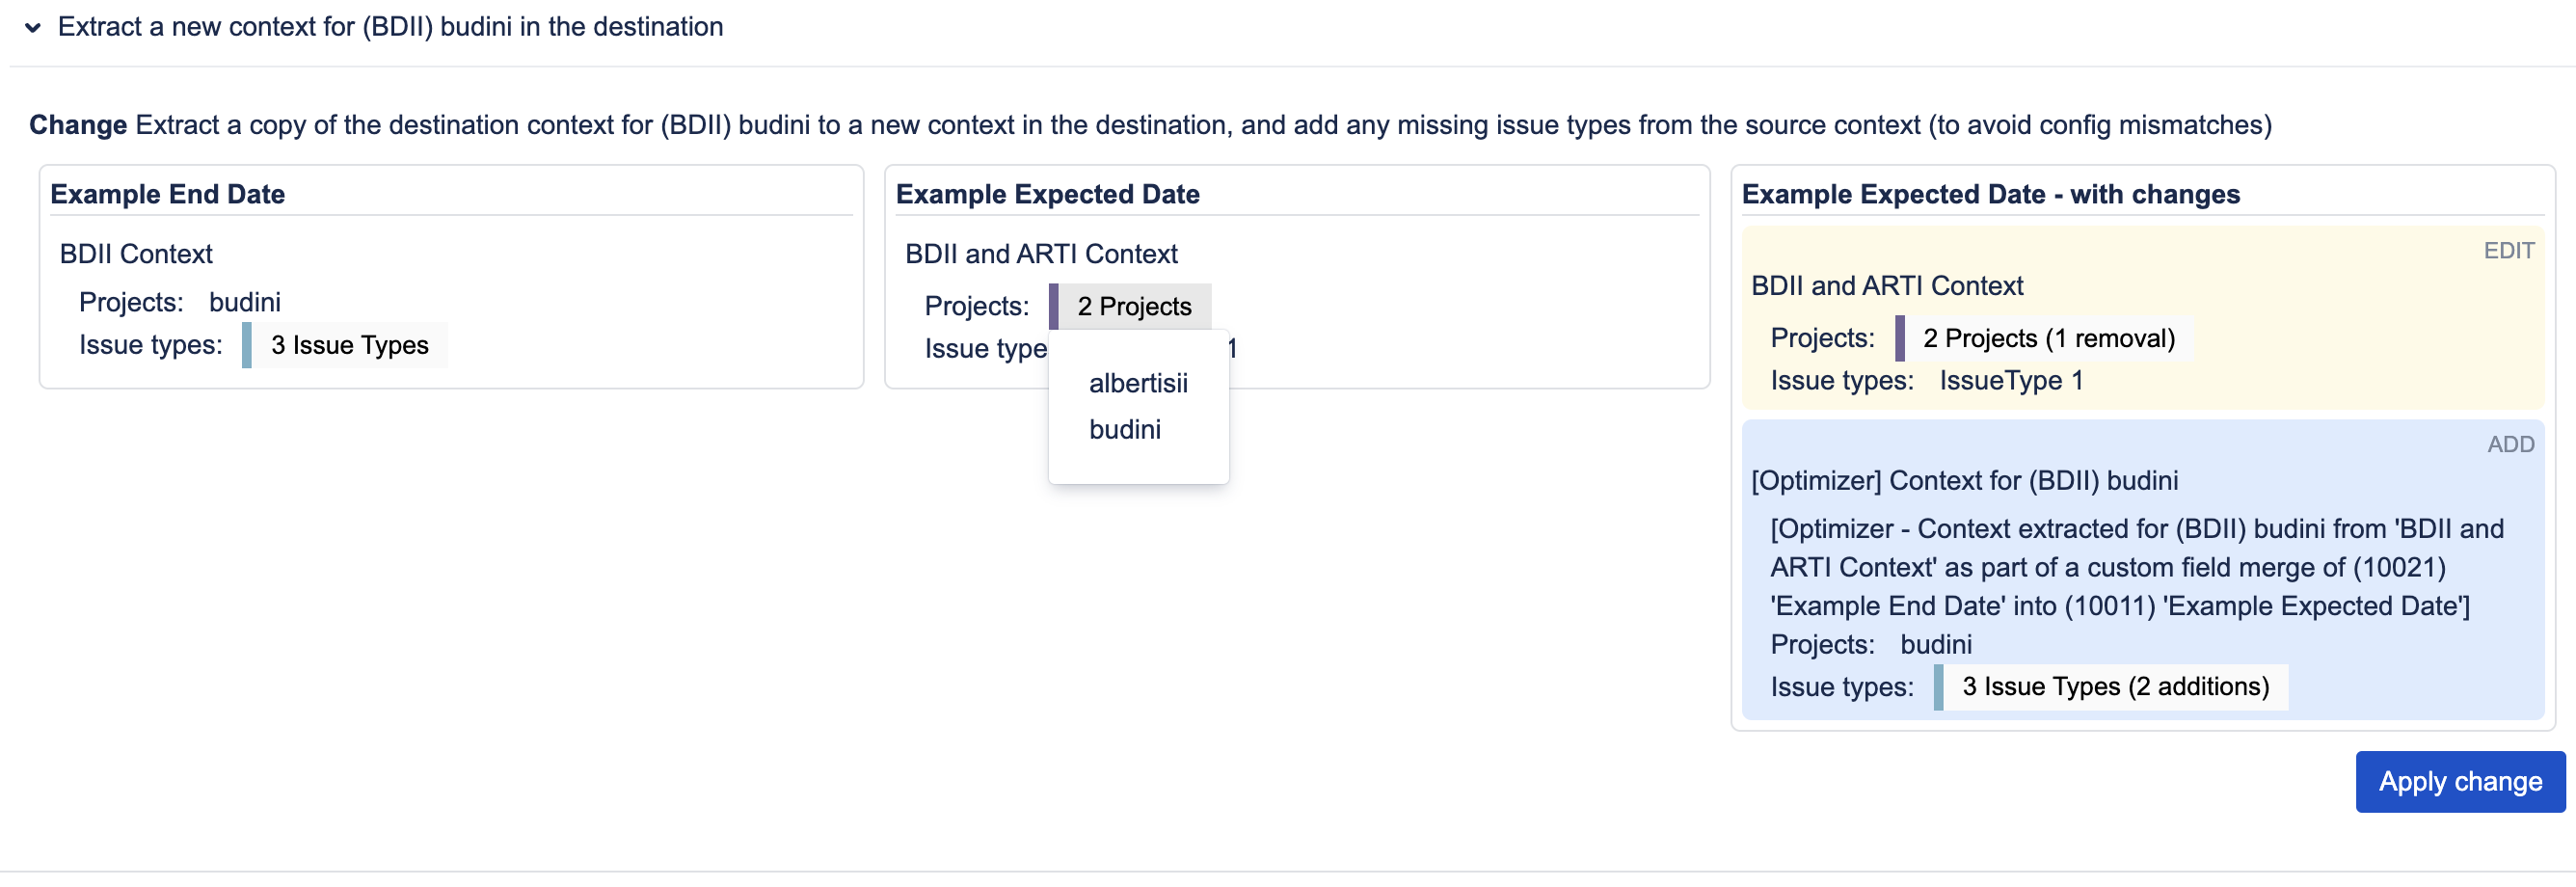
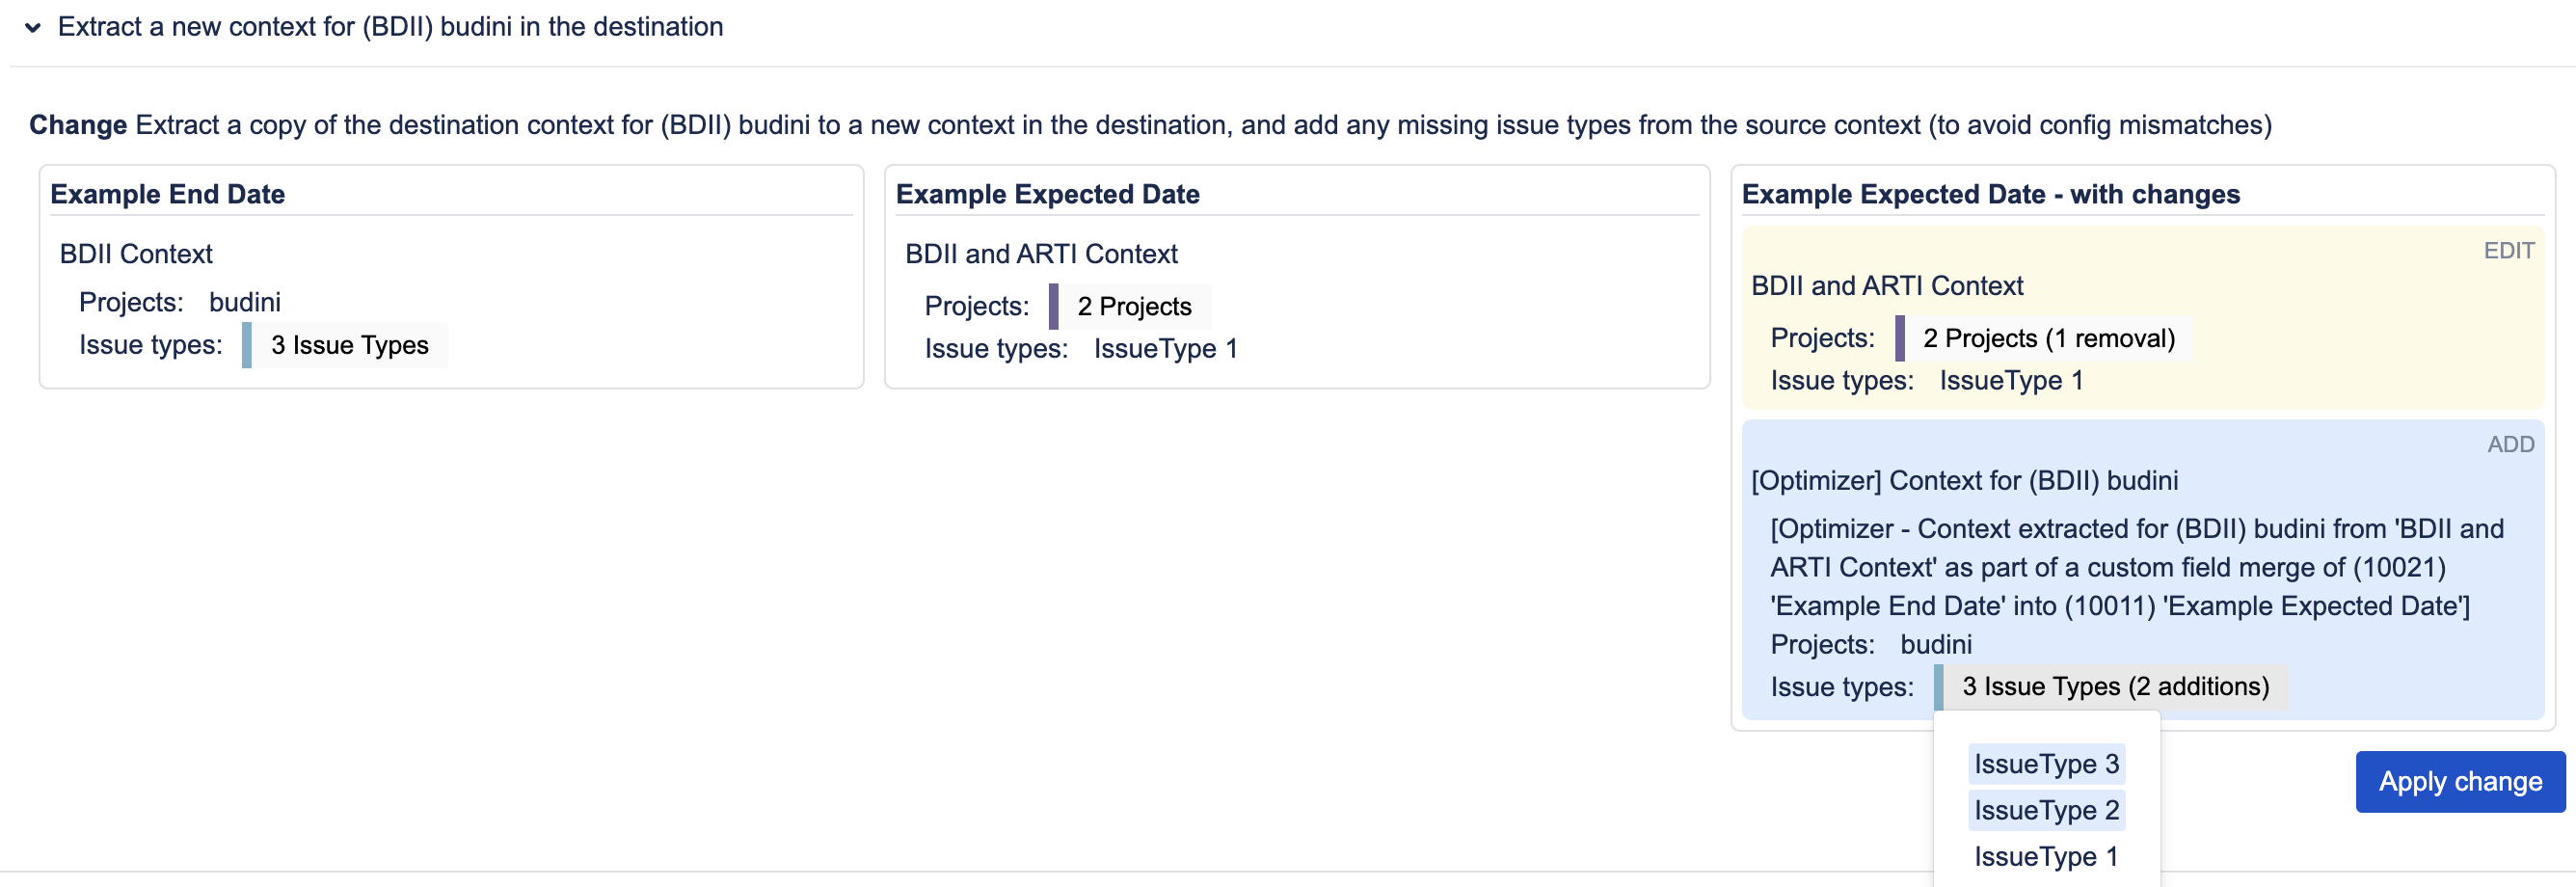
In the above screenshots, the Source is configured for use in the ‘budini’ project on 3 issue types: ‘IssueType 1’, ‘IssueType 2’, and ‘IssueType 3’. However, the Destination is configured to be used on just one issue type in the ‘budini’ project: ‘IssueType 1’.
Usually we would want to add the missing issues types ( ‘IssueType 2’ and ‘IssueType 3’) into the Destination context. Doing so would mean the Destination would have the same behavior as the Source for the ‘budini’ project.
However, the Destination context also has the ‘albertisii’ project in its scope. Adding in the missing issue types would make the Destination available on ‘IssueType 2’ and ‘IssueType 3’ in the ‘albertisii’ project when it was previously only configured for use with ‘IssueType 1'. So, adding the missing issues types to the Destination would create behavior not present prior to the merge.
To avoid this, we extract a new context in the Destination for just the ‘budini’ project, which is configured the same as before but now we can add the missing issue types without problems. The original context has ‘budini’ removed (as it now has its own context) but is otherwise unaltered so its behavior is maintained. As a result, the Destination behavior has been preserved whilst missing behavior from the Source has been added.
Optimizer will add [Optimizer] tags to the name and description (with an explanation in the latter case) of the new context for accountability as to where the auto-generated context originated from.
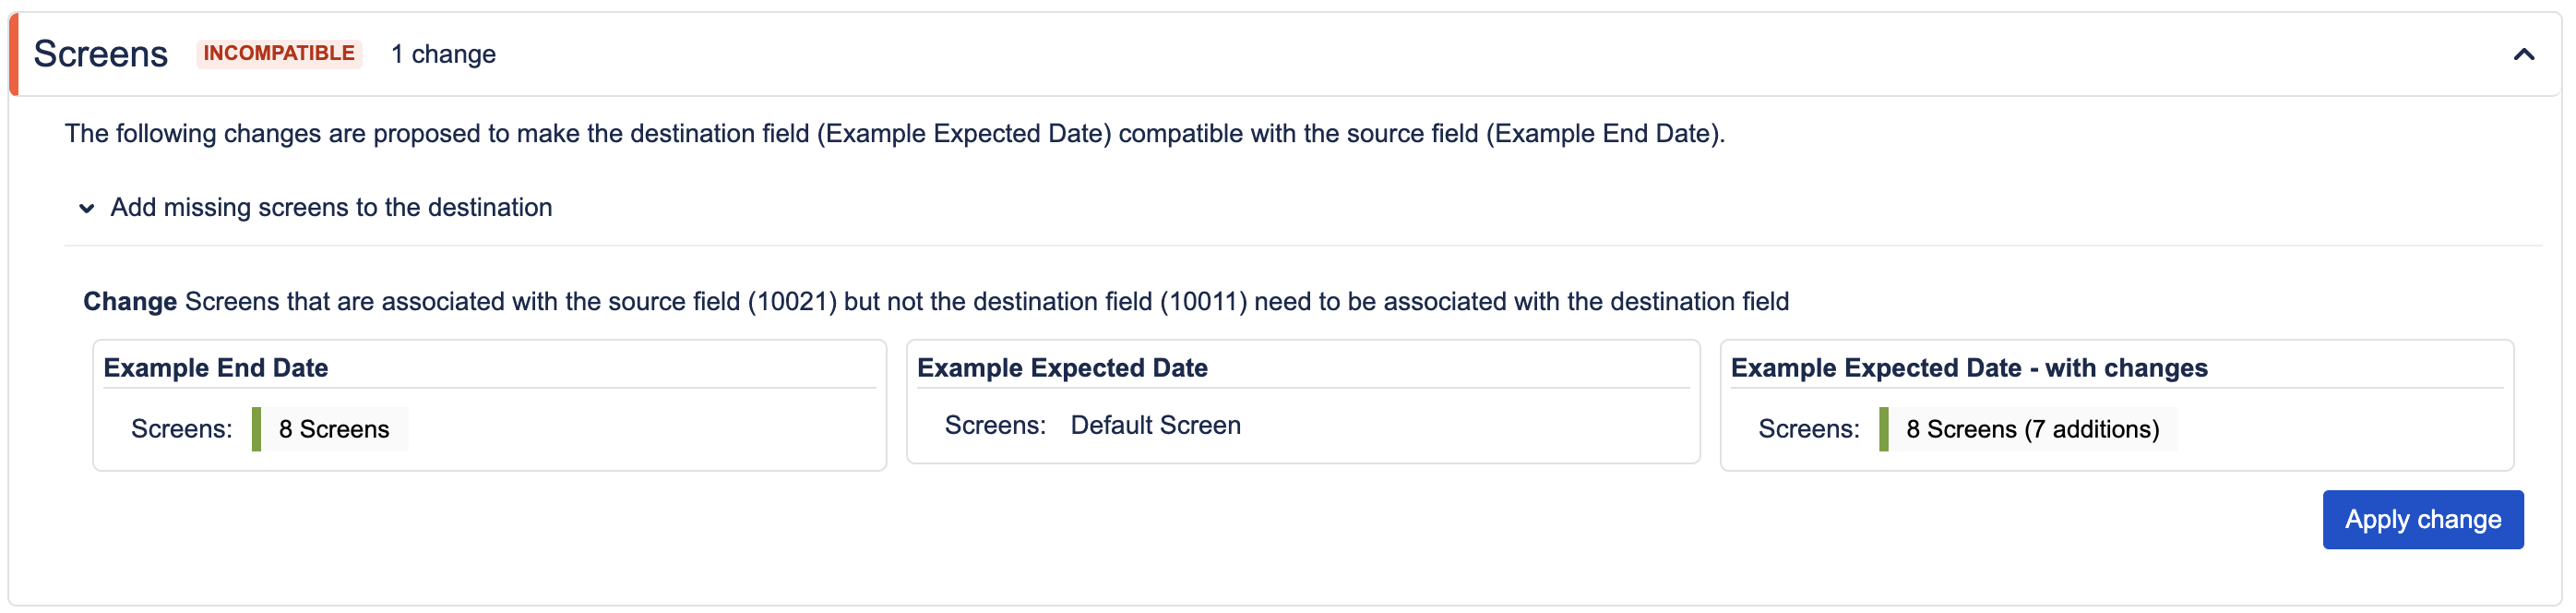
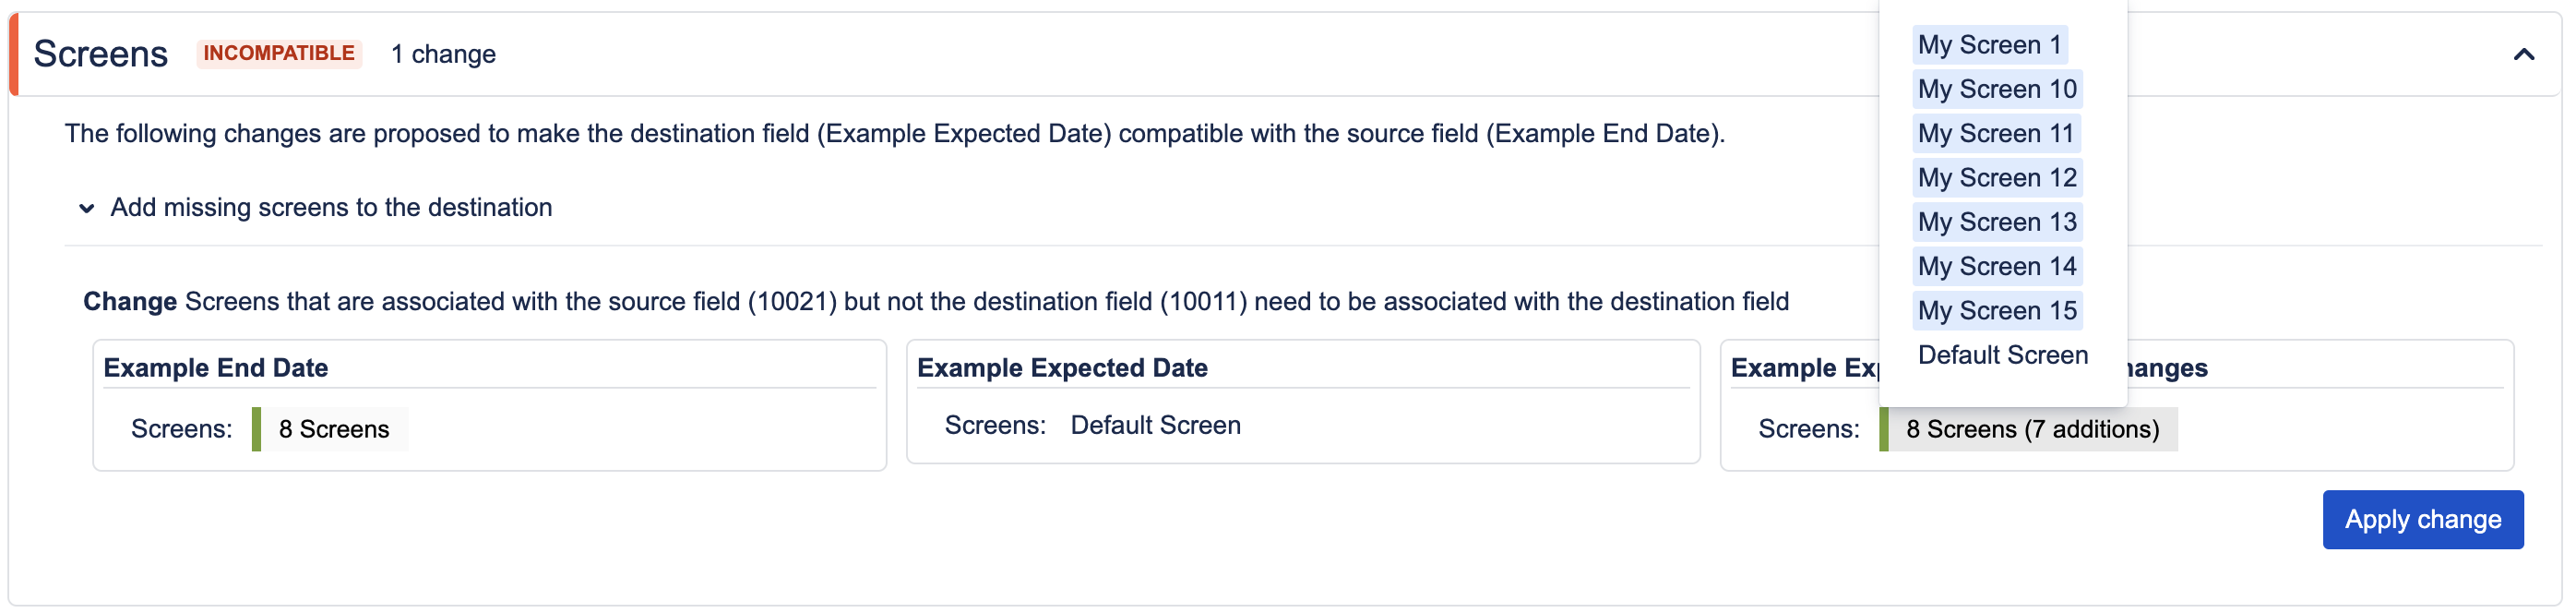
Screens
For associated screens, there will only ever be either no changes needed or a single proposed change to associate the Destination with any screens the Source is associated with that the Destination is not. This will ensure that the destination can be used on any and all screens where the source can be used.

Step 5 – Merging values
Having (optionally) merged the configurations of the fields, the next step is to copy over all values from the Source to the Destination.
On the Values Merge screen, you will first be presented with the Source and Destination fields and their relevant configurations so that you may review the results of all previous steps before proceeding.
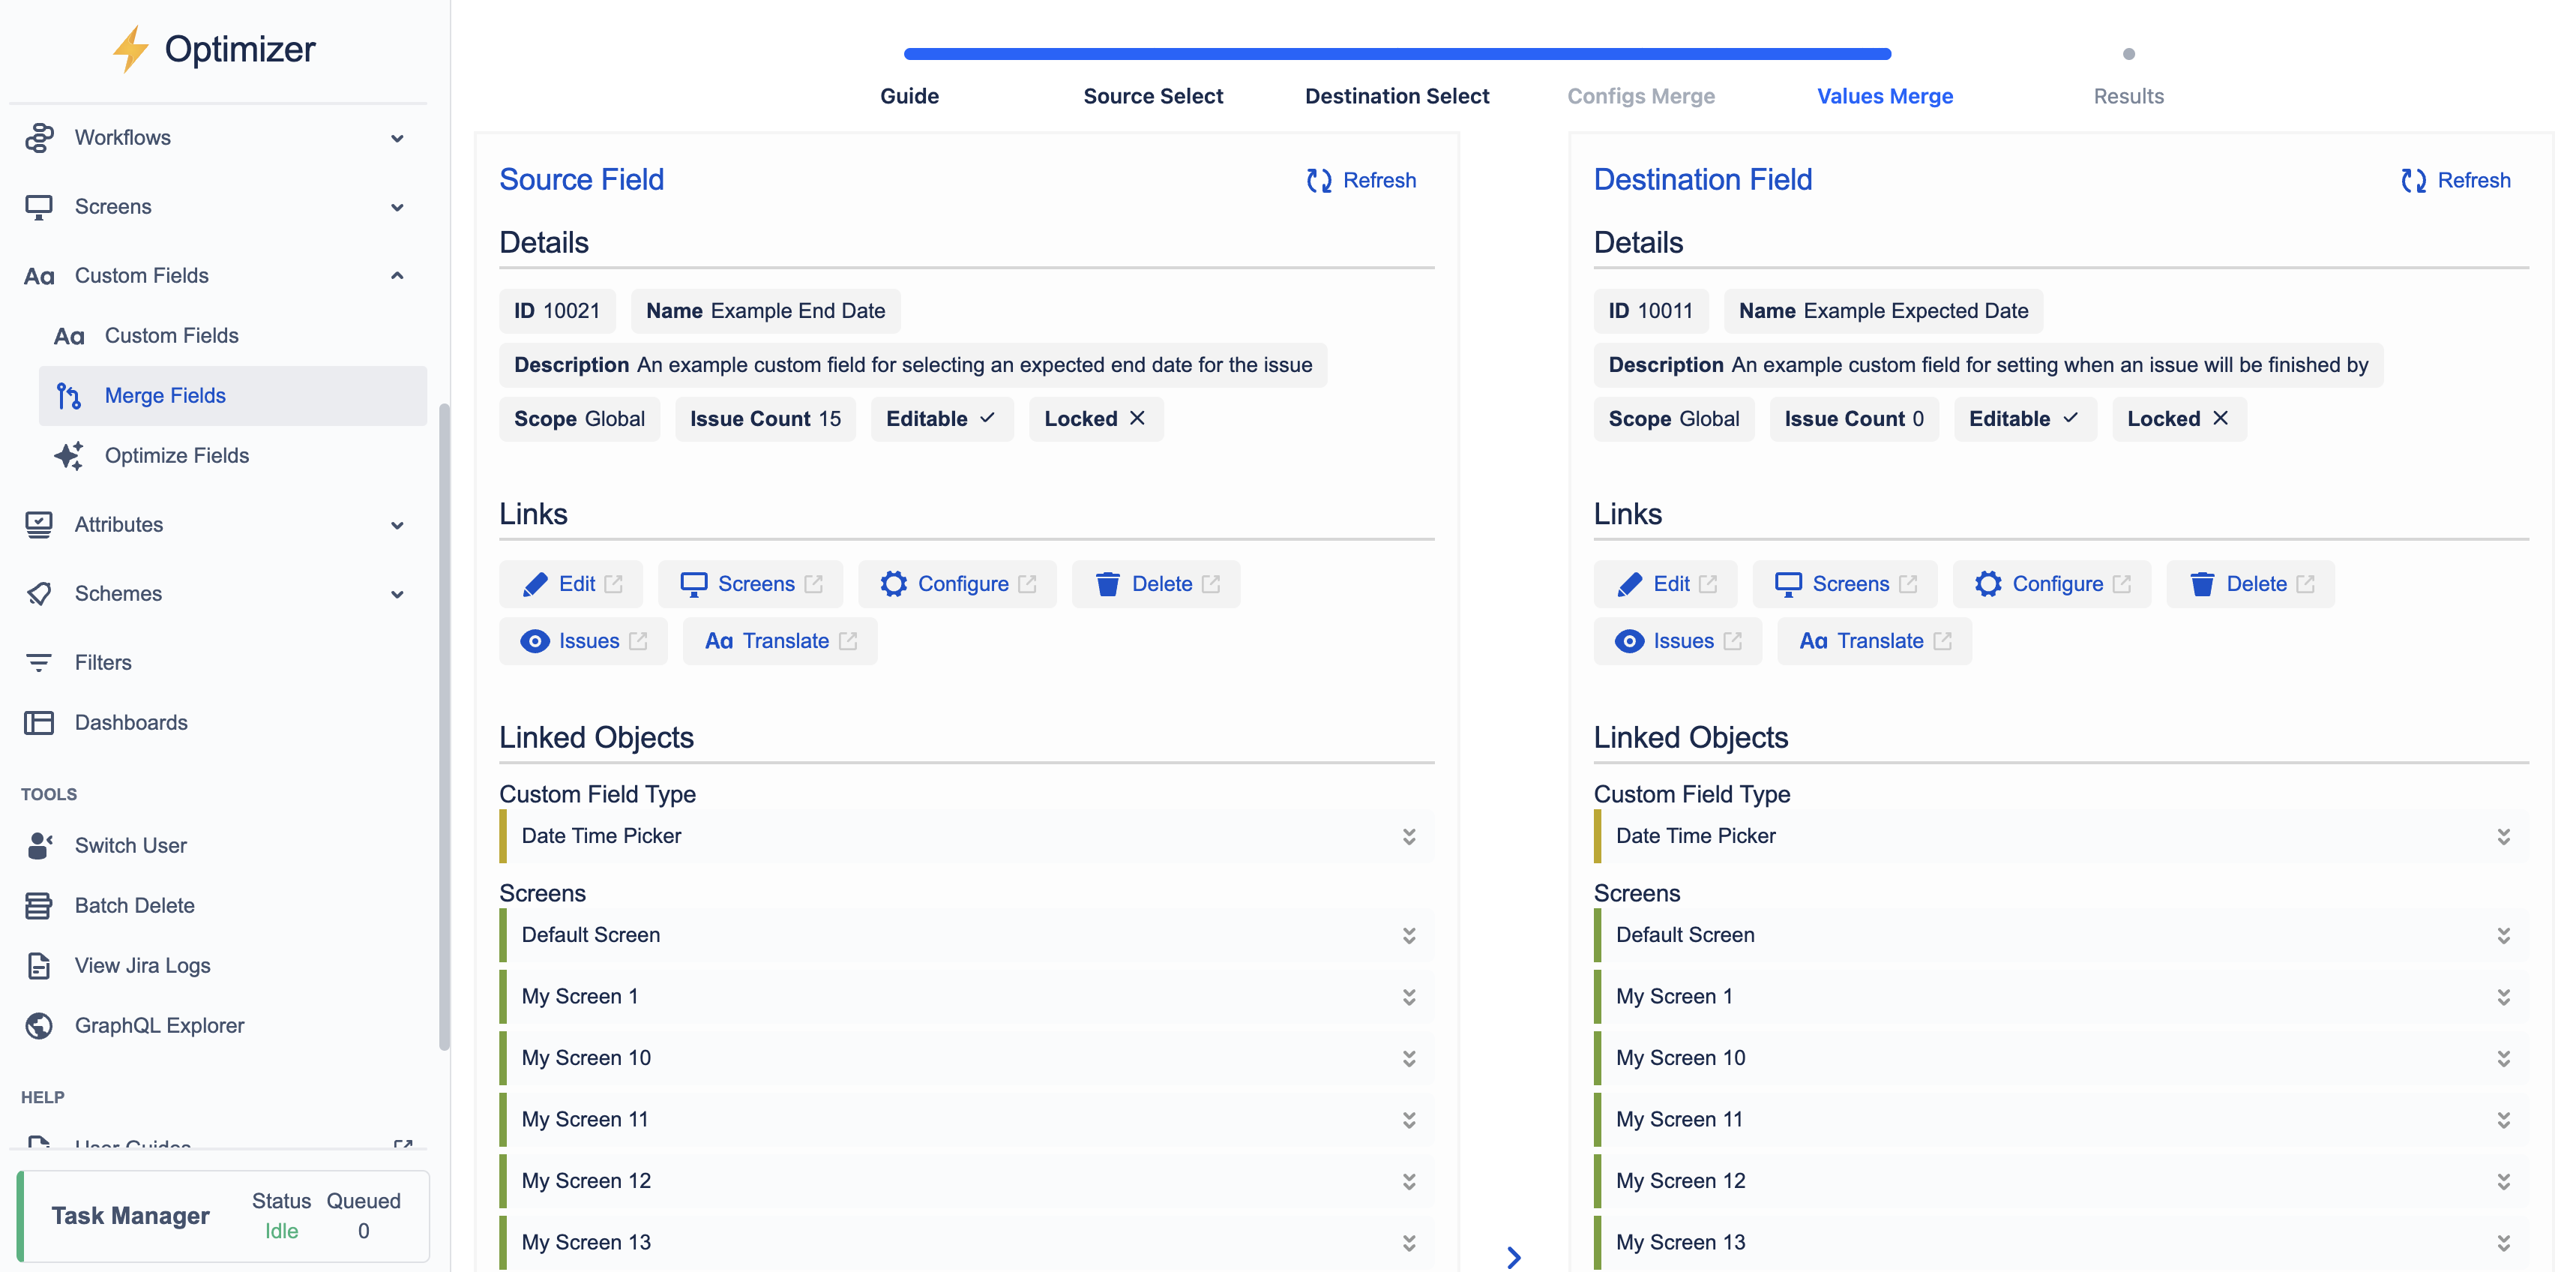
On all issues where the Source and Destination fields are available, the Source value (if it exists) will be copied over to the Destination value.
You are presented with options for how you want to resolve the scenario where there is an existing Destination value. You can specify to:
-
Overwrite any existing Destination values with the Source values, or
-
Preserve the existing Destination values and skip copying the Source values on such issues
If you are happy to proceed with the value merging, you may initiate the task immediately or queue it for later execution.


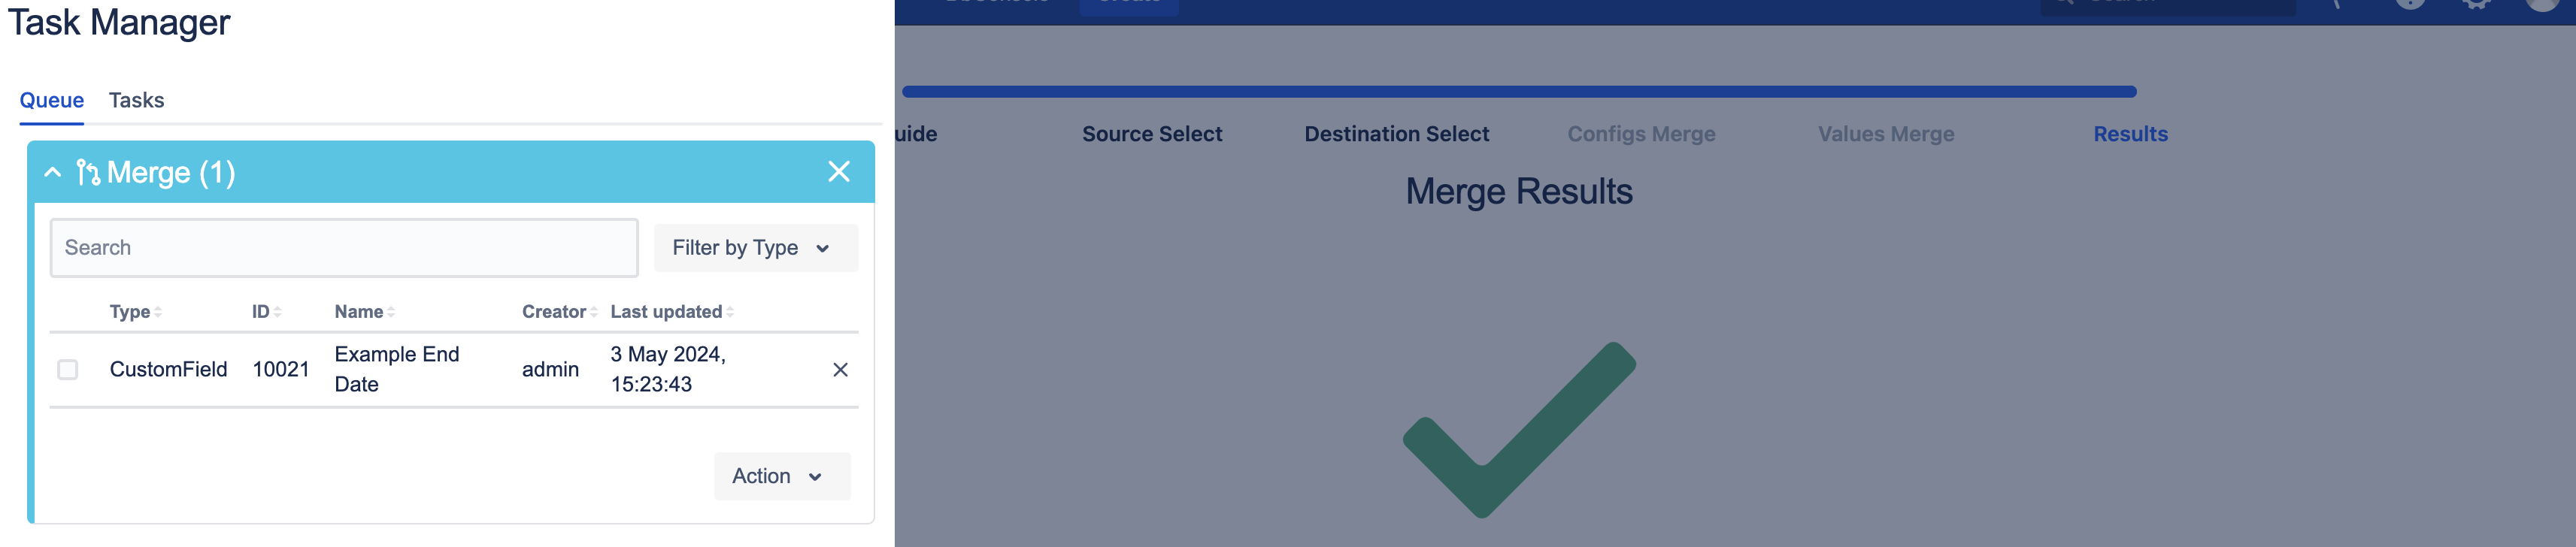
Step 6 – Results
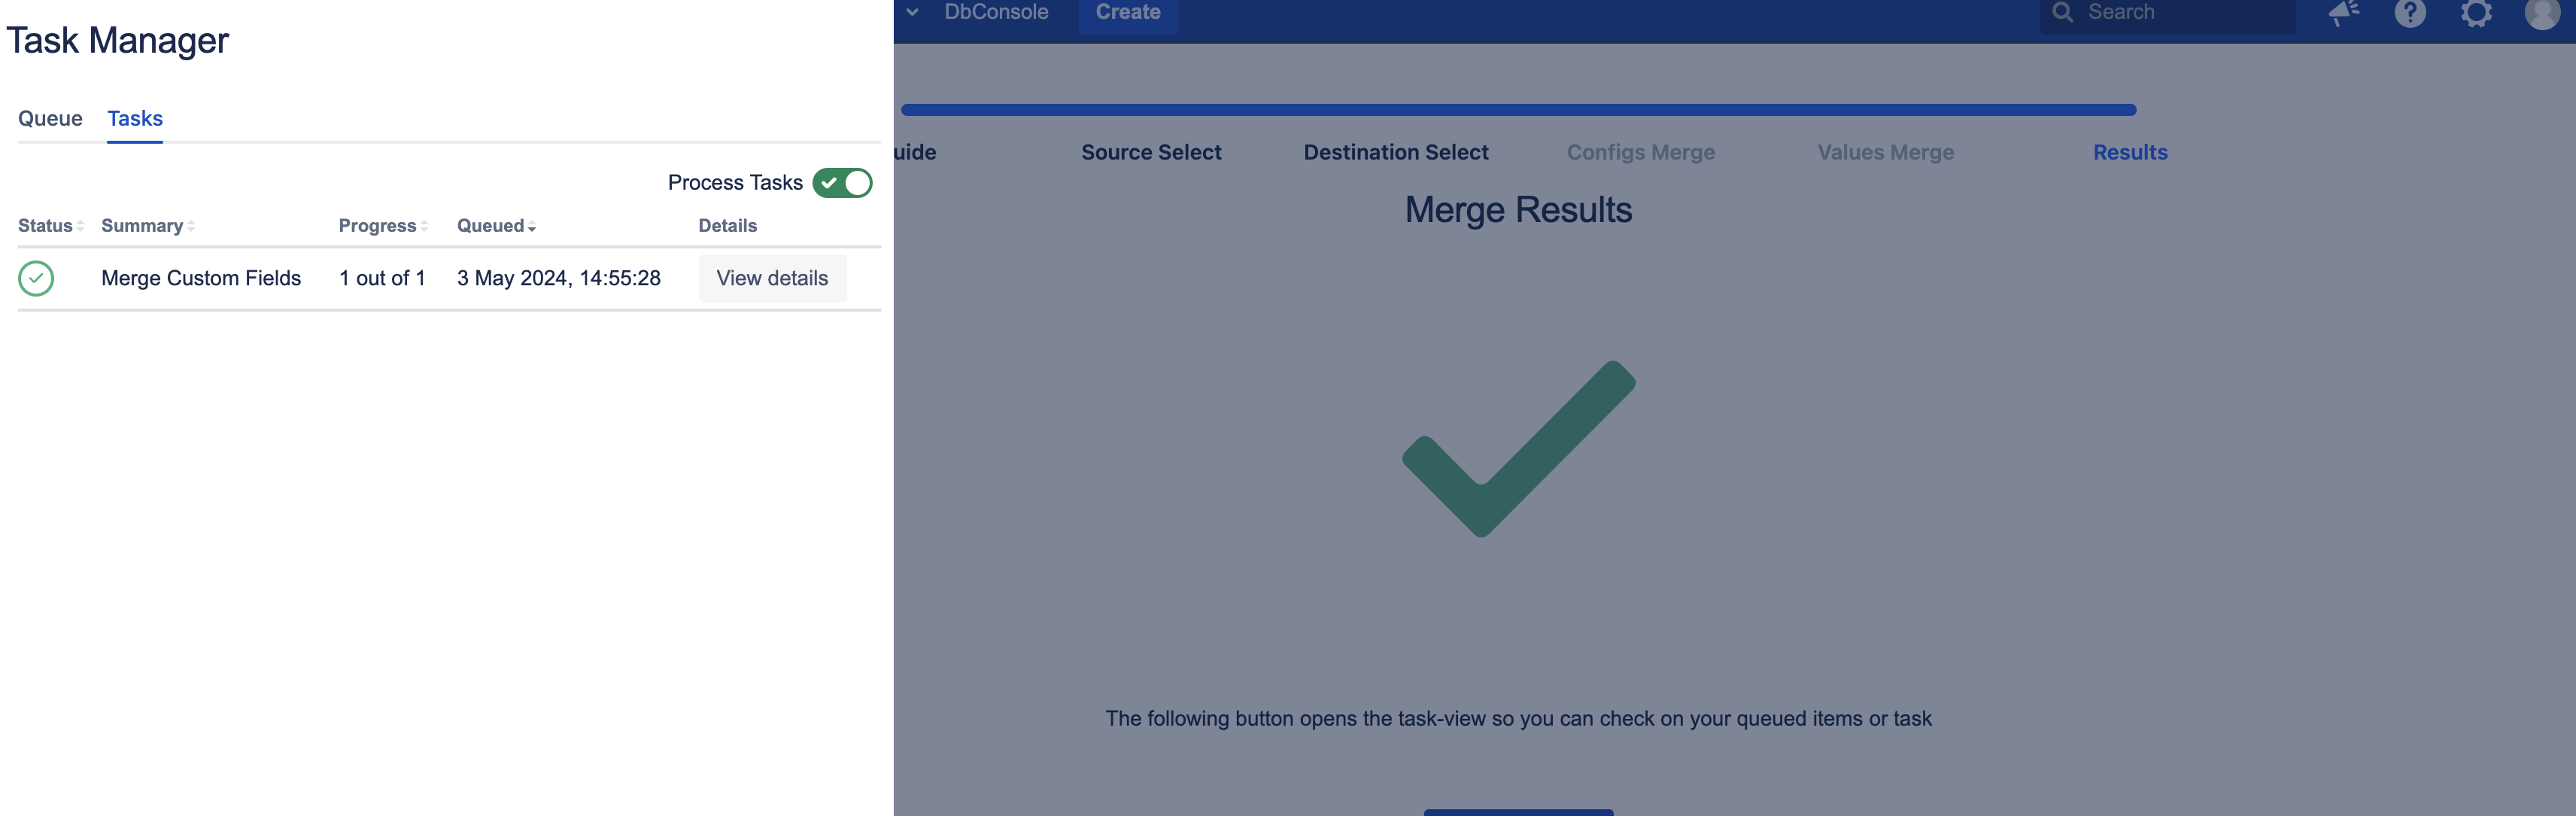
Whether you choose ‘Execute Now' or 'Queue as Task’, the results page will explain that the value merge task has been added to the Task Manager. If queued, you can run the task from the Queue tab whenever possible. You can view the task’s progress on the Tasks tab if initiated.
As the Source and Destination fields may be involved in a significantly large number of issues (because they have heavy usage and/or the instance is very large), the task to copy values from the Source to the Destination is added to the Task Manager so it can be executed asynchronously in the background without you having to monitor it - you can continue with other admin tasks whilst it executes.
Need support? We’re here to help 🧡
If you have any questions about Optimizer or would like to speak with us, please don’t hesitate to contact our Customer Support team.